Perspectium On-demand DataSync gives you the power to provision an Amazon Web Services (AWS) EC2 instance, DataSync agent, and Relational Database Service (RDS) in your AWS account that will handle the syncing of your ServiceNow incident data. Plus, once your incident data is synced in your RDS, you can then view predefined dashboards with Incident Analytics, giving you better insight into your incident management processes.
![]() NOTE: If you previously created a Perspectium On-demand DataSync AWS stack, contact Perspectium Support for a guided setup of On-demand DataSync and Incident Analytics.
NOTE: If you previously created a Perspectium On-demand DataSync AWS stack, contact Perspectium Support for a guided setup of On-demand DataSync and Incident Analytics.
Prerequisites
![]() First, you will need an active ServiceNow instance (any version).
First, you will need an active ServiceNow instance (any version).
![]() You will also need to create and activate an AWS account.
You will also need to create and activate an AWS account.
![]() If using Perspectium Incident Analytics (preconfigured Tableau dashboards to visualize your ServiceNow incident data), you will need Tableau version 10.2 or higher.
If using Perspectium Incident Analytics (preconfigured Tableau dashboards to visualize your ServiceNow incident data), you will need Tableau version 10.2 or higher.
Procedure
To set up On-demand DataSync and Incident Analytics, follow these steps:
Access the Perspectium On-demand DataSync app
Log into your AWS account. Then, go to the AWS Marketplace and search for Perspectium On-demand DataSync. On the app landing page, click Continue to Subscribe in the upper right-hand corner of the screen.
On the Subscribe to this Software page, click Accept Terms to accept the terms of the Perspectium End User License Agreement (EULA) and the AWS Customer Agreement. Then, wait for your request to be processed and click Continue to Configuration.
Start CloudFormation launch
On the Configure this software page, choose Perspectium On-demand DataSync Deployment from the Fulfillment Option dropdown. Then, choose a Software Version and the Region where your AWS server is located and click Continue to Launch in the upper right-hand corner of the screen.
On the Launch this software page, choose to Launch CloudFormation from the Choose Action dropdown.
Launch CloudFormation
On the Select Template page, make sure the Specify an Amazon S3 template URL is selected and the URL is populated from subscribing to the app.
Finally, click Next.
Configure your AWS stack settings
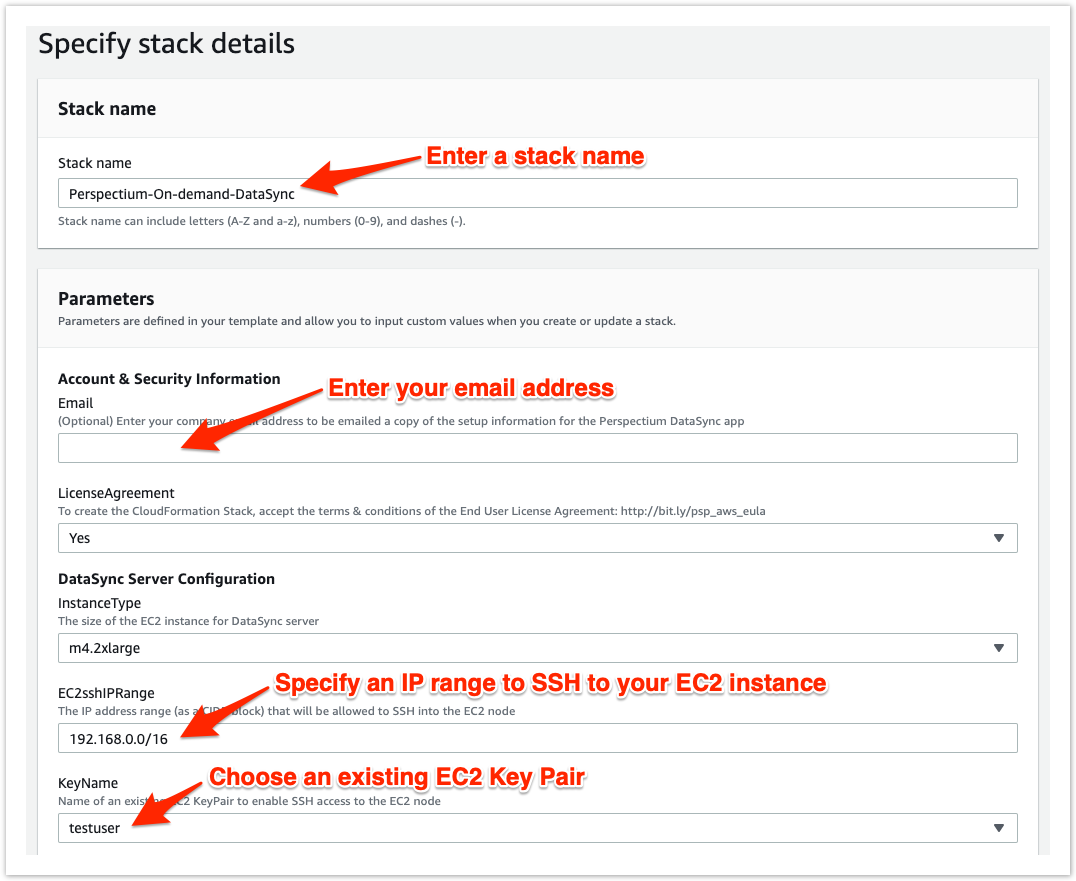
On the resulting page, type a name for your Stack name consisting of letters, numbers, and dashes (e.g., Perspectium-On-demand-DataSync).
Under Parameters and in the Account & Security Information section, enter your Email Address and accept the License Agreement.
Next in the DataSync Server Configuration section, select an AWS Instance Type for the EC2 instance where the DataSync agent will run on, specify a range of IP addresses (as a CIDR block; e.g. 192.168.0.0/16, 0.0.0.0/0, etc.) in the IPRangeforEC2SSH field that will be able to SSH to your EC2 instance where the DataSync Agent is running.
Then, choose a previously created EC2 Key Pair for authentication when accessing your EC2 instance via SSH.
![]() NOTE: If you haven't already created an EC2 Key Pair, you can create one within your AWS account or using a command line interface.
NOTE: If you haven't already created an EC2 Key Pair, you can create one within your AWS account or using a command line interface.
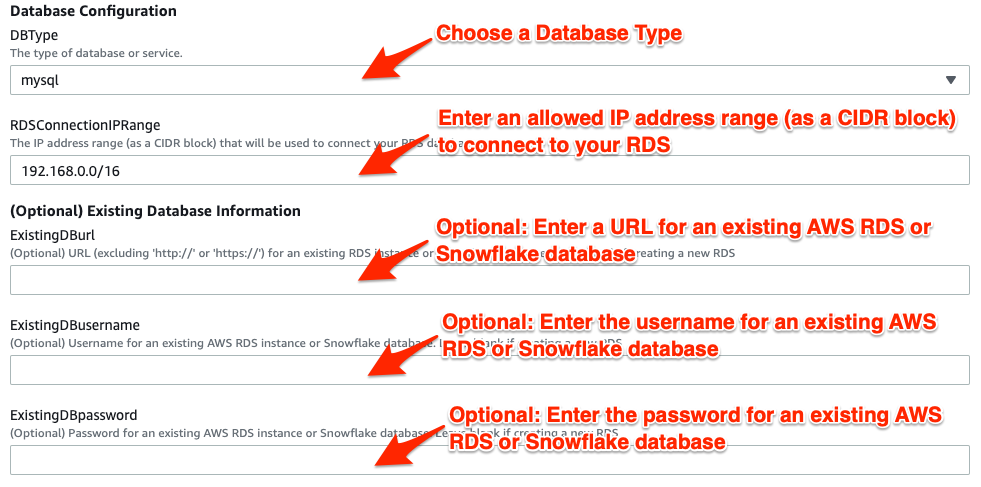
In the Database Configuration section, choose the Database Type that you want to sync your ServiceNow incident data with from the DBType field.
Then, specify a range of IP address (as a CIDR block; e.g. 192.168.0.0/16, 0.0.0.0/0, etc.) used to connect to your AWS RDS.
![]() NOTE: This should include the IP address of the EC2 instance created with this stack so the DataSync Agent can connect to the RDS to save data. It is recommended you use the value of 0.0.0.0/0 and then change it after the stack has completed to update to the IP address of your EC2 instance if you want to restrict access to only the instance.
NOTE: This should include the IP address of the EC2 instance created with this stack so the DataSync Agent can connect to the RDS to save data. It is recommended you use the value of 0.0.0.0/0 and then change it after the stack has completed to update to the IP address of your EC2 instance if you want to restrict access to only the instance.
You can optionally enter an existing RDS (if you have already created one in your AWS account) or Snowflake database to use by entering its URL and credentials in the ExistingDBurl, ExistingDBusername and ExistingDBpassword fields.
![]() NOTE: Snowflake requires you enter an existing Snowflake database as Snowflake currently cannot be created through an AWS CloudFormation.
NOTE: Snowflake requires you enter an existing Snowflake database as Snowflake currently cannot be created through an AWS CloudFormation.
Finally, click Next to go on to the Configure stack options page.
Configure stack options (optional)
The Configure stack options page contains some optional configurations you can set for your ServiceBond EC2 instance. For more information on these configurations, see setting AWS CloudFormation Stack Options.
However, in most cases, you can simply accept the default options on this page and click Next at the bottom of the page to navigate to the Review page and review your EC2 instance settings.
Review and launch your AWS stack
At the bottom of the Review page, check the box to acknowledge that AWS CloudFormation might create IAM resources. Then, click Create stack to finish configuring your ServiceBond EC2 instance.
![]() NOTE: Your EC2 instance will take approximately 15-20 minutes to fully initialize. You can confirm that your EC2 instance is ready by navigating to Services > EC2 (under Compute) > Instances. Your EC2 instance will be ready when the
NOTE: Your EC2 instance will take approximately 15-20 minutes to fully initialize. You can confirm that your EC2 instance is ready by navigating to Services > EC2 (under Compute) > Instances. Your EC2 instance will be ready when the ![]() icon appears in the Status Checks column for your instance.
icon appears in the Status Checks column for your instance.
View your Setup Information
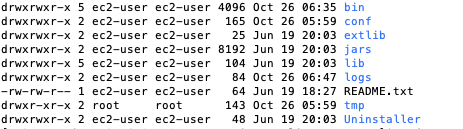
After the CloudFormation stack has completed, the DataSync Agent will be installed in the EC2 instance at /home/ec2-user/perspectium/Perspectium_Replicator_Agent. The Agent will have the following folder structure:
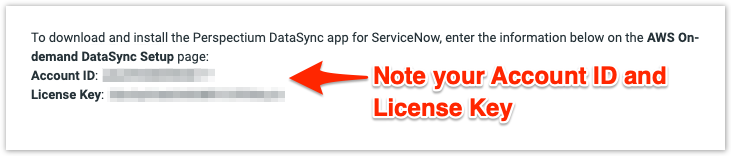
Your setup information will be saved in the file /home/ec2-user/perspectium/Perspectium_Replicator_Agent/conf/perspectium_setup_information.txt on the EC2 instance created. If you entered your email address in the Parameters in Step #4, you will receive an email from Perspectium Support confirming that your Perspectium On-demand DataSync stack has been configured. Next complete either Step #7a or Step #7b as applicable:
7a) New to Perspectium?
If this is your first time using a Perspectium product, note your Perspectium Account ID and Perspectium License Key in the setup information file or your confirmation email. You will need to enter this information on the AWS On-demand DataSync Setup page in Step #10. But for now, proceed to Step #8.
7b) Already using a Perspectium for ServiceNow app?
To enable On-demand DataSync with your existing Perspectium app, you must have at least the Fluorine Patch 1 of the Perspectium app. So the DataSync agent can create tables in the database properly, select the Share schema option enabled under the Advanced tab in your bulk share. If you would like to use the Tableau Incident Analytics in the steps below, enable the add display values option enabled in Replicator Properties.
If you have already installed a Perspectium app on your ServiceNow instance and are comfortable creating ServiceNow shared queues and bulk shares, you can use the Queue name, Endpoint URL, Queue username, Queue password, and Queue Encryption Key in the setup information file or your confirmation email to create a new ServiceNow shared queue in your instance.
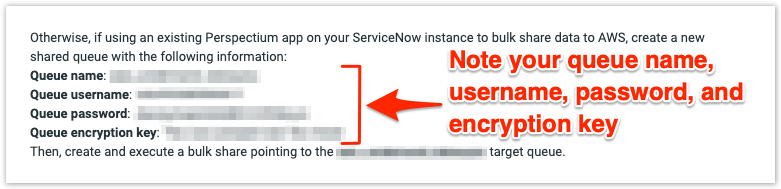
Then, create a ServiceNow bulk share pointing to the target queue and proceed to Step #12.
Download the DataSync for ServiceNow app
Download the Perspectium DataSync for ServiceNow app here, and note the directory where you save the file.
Install the DataSync for ServiceNow app
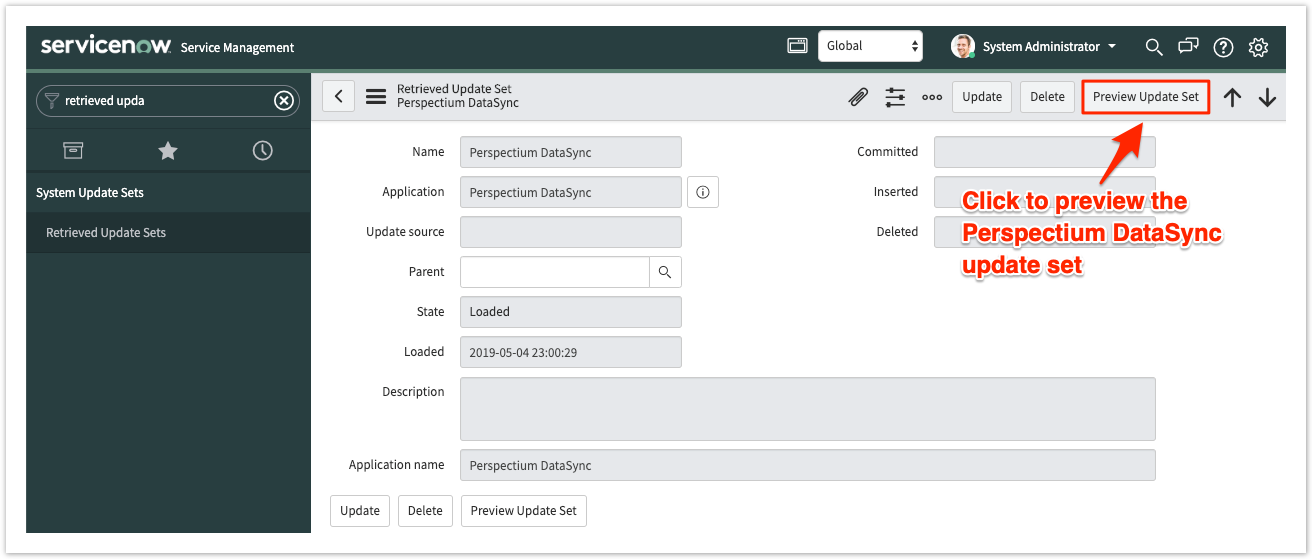
Log into your ServiceNow instance and use the Filter Navigator to navigate to System Update Sets > Retrieved Update Sets. In the resulting form, click Import Update Set from XML under the Related Links section. Upload the Perspectium DataSync update set (.xml file) from the directory you saved the file in for Step #7. Then, click into the Perspectium Data Sync update set and click Preview Update Set.
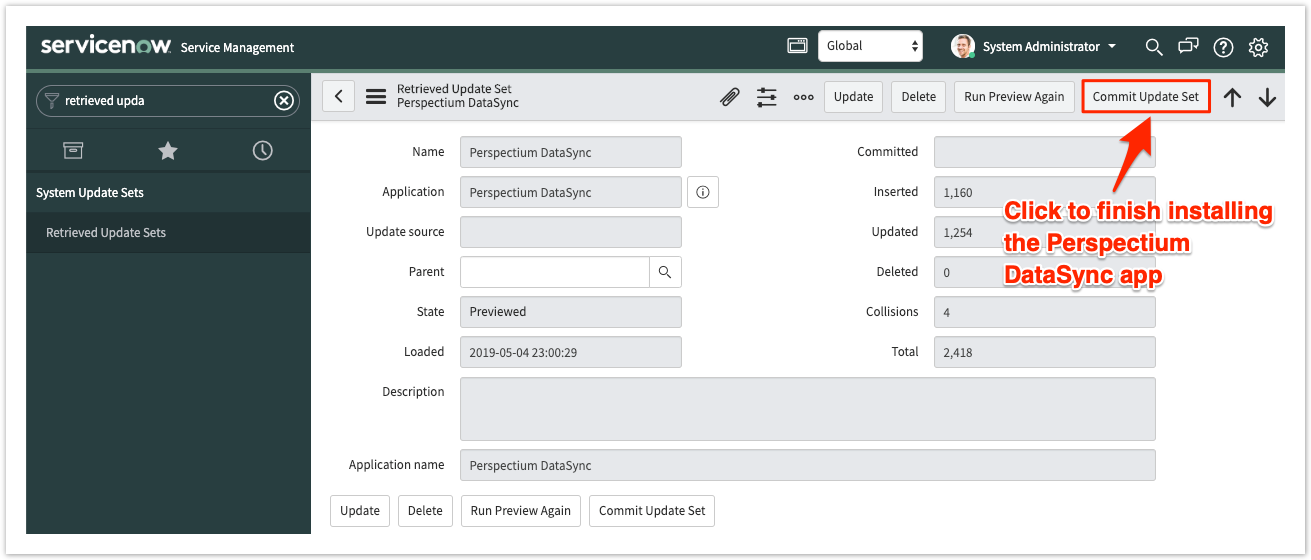
After Preview Update Set finishes running, close out of the pop-up and check if there are any errors or warnings. If errors or warnings have occurred, they will appear in the list at the bottom of the form under the Update Set Preview Problems tab. Check the box next to each error or warning and choose whether to Accept remote update or Skip remote update. To view previously configured fields and updates that may be affected for each error or warning, click Show local field and/or Show local update. For more information, see preview a remote update set.
Once any errors or warnings have been addressed, click Commit Update Set in the upper right-hand corner of the form. After Update Set Commit finishes running, close out of the pop-up.
Set up your DataSync app
In ServiceNow's Filter Navigator, navigate to Perspectium DataSync > Control and Configuration > Setup. On the User Agreement page, read through the terms of the Perspectium User Agreement and then click I Accept to accept these terms.
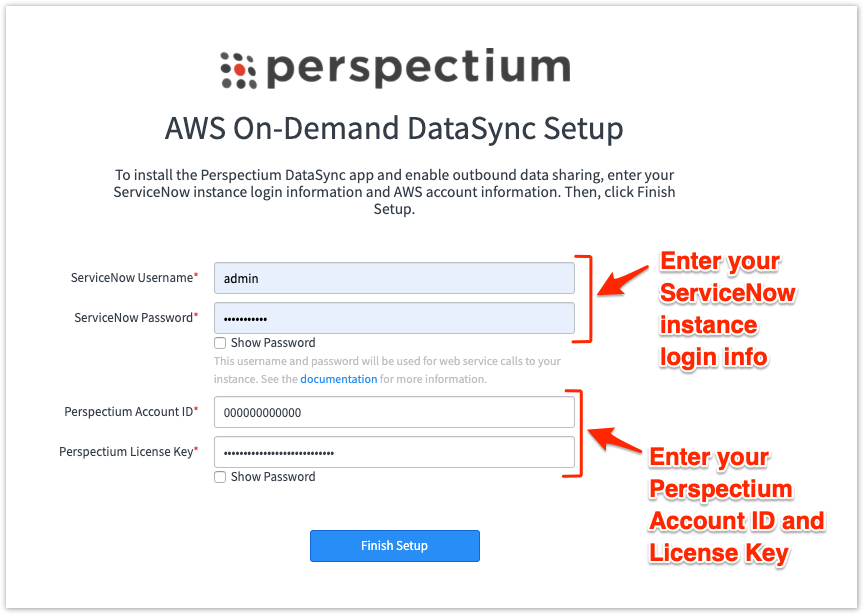
On the AWS On-demand DataSync Setup page, enter your ServiceNow username and password in the appropriate fields.
![]() NOTE: The ServiceNow user must have the role of admin.
NOTE: The ServiceNow user must have the role of admin.
Then, enter the Perspectium Account ID and License Key you received in your confirmation email in Step #6 and click Finish Setup.
![]() NOTE: If you change your ServiceNow password after entering it on the AWS On-demand DataSync Setup page, you will need to update your ServiceNow Password in your Perspectium Properties by navigating to Perspectium DataSync > Control and Configuration > Properties and then clicking Save after updating your password. For more information about using Perspectium DataSync, see DataSync for ServiceNow.
NOTE: If you change your ServiceNow password after entering it on the AWS On-demand DataSync Setup page, you will need to update your ServiceNow Password in your Perspectium Properties by navigating to Perspectium DataSync > Control and Configuration > Properties and then clicking Save after updating your password. For more information about using Perspectium DataSync, see DataSync for ServiceNow.
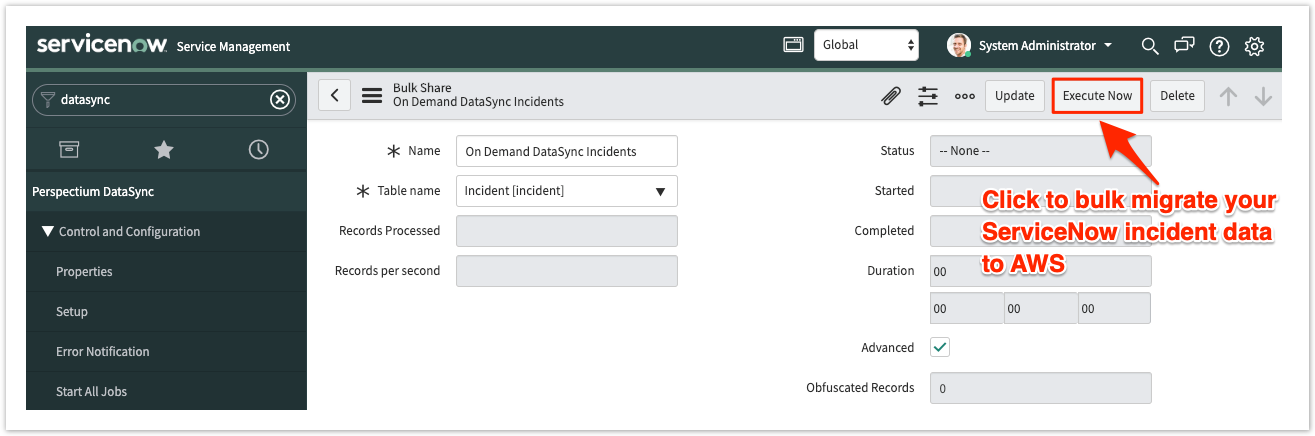
Run your ServiceNow bulk share
You will then be automatically redirected to the Perspectium Bulk Share list view. Click into the On Demand DataSync Incidents bulk share record and then click Execute Now, which will initiate the bulk migration of your existing incident data from ServiceNow to your AWS RDS.
Open your preconfigured Tableau workbook
Download and then open one of the following preconfigured Incident Analytics workbooks for Tableau per the Database Type you selected in Step #3:
| Database Type | File to download |
|---|---|
| MySQL | Incident Analytics for MySQL |
| Oracle | Incident Analytics for Oracle |
| MS SQL Server | Incident Analytics for MS SQL Server |
![]() NOTE: If using a Tableau version higher than 10.2, a pop-up will appear asking you to confirm upgrade to your current Tableau version. Click OK to accept this upgrade.
NOTE: If using a Tableau version higher than 10.2, a pop-up will appear asking you to confirm upgrade to your current Tableau version. Click OK to accept this upgrade.
![]() NOTE: If you have your own Tableau data visualizations that you want to use for ServiceNow data other than incident data, you can skip Steps #11-14.
NOTE: If you have your own Tableau data visualizations that you want to use for ServiceNow data other than incident data, you can skip Steps #11-14.
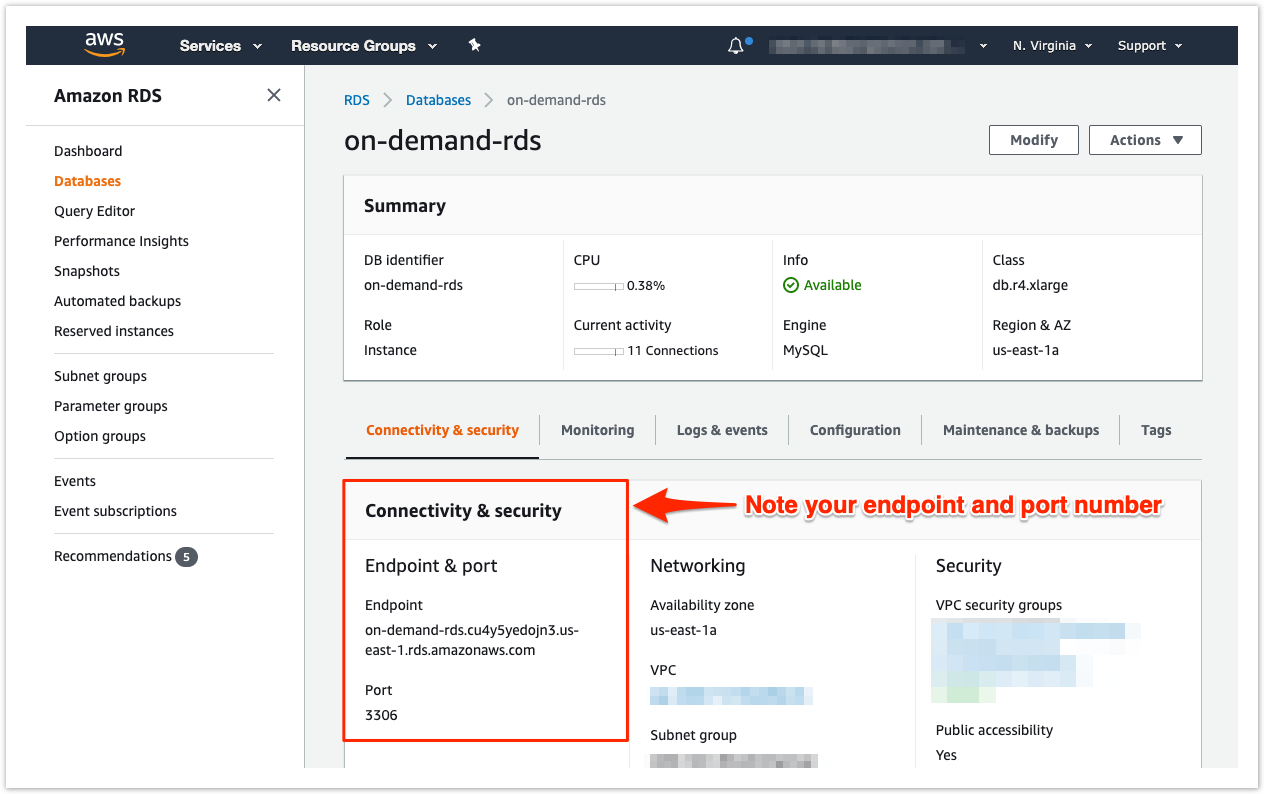
Connect Tableau to your AWS RDS
Locate your AWS RDS connection information by logging into your AWS account and navigating to Services > RDS (under Database) > DB Instances (under Resources). Click the name of the stack you created in Step #3. Note your Endpoint and Port under the Connectivity & Security tab.
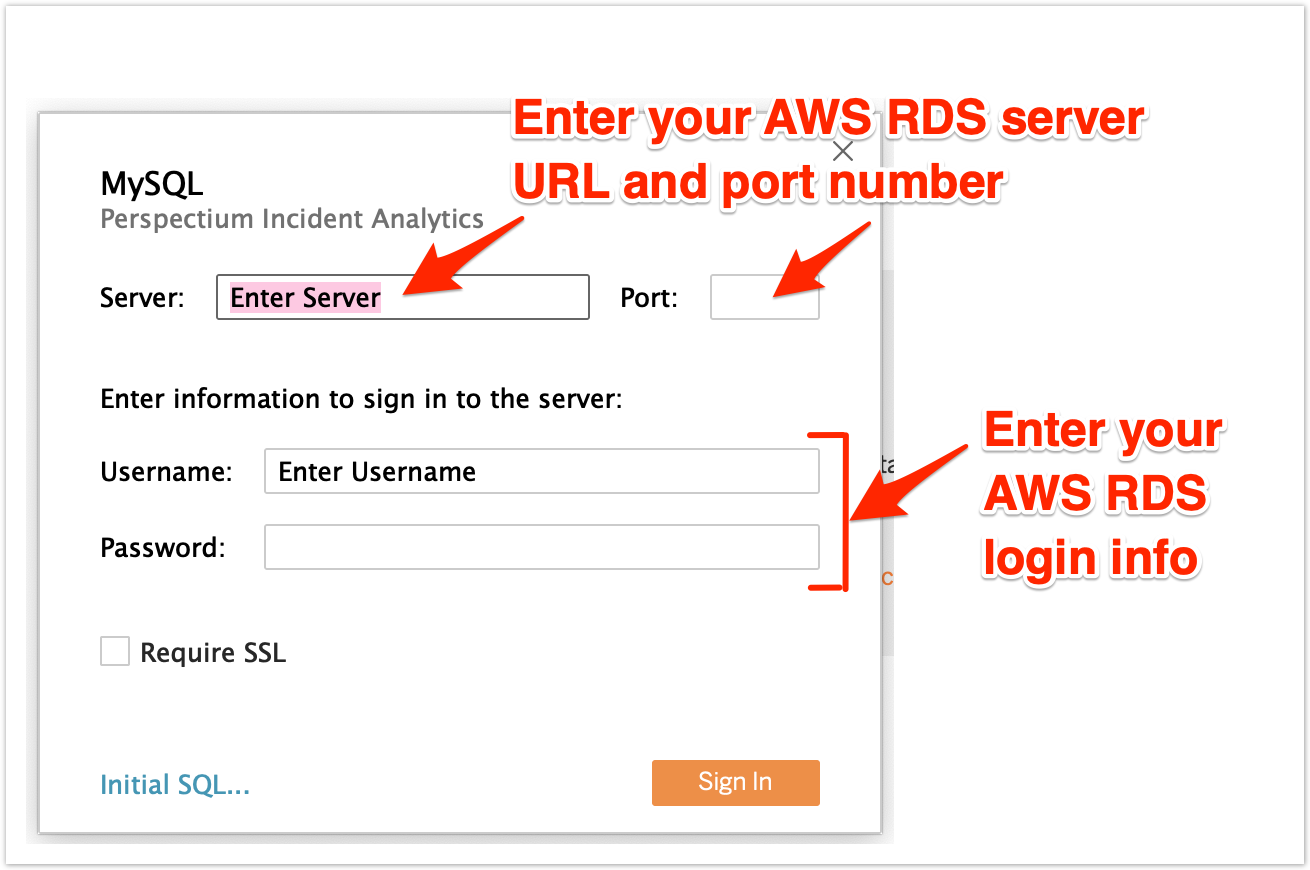
Back in Tableau, enter your database Server URL (as your AWS RDS Endpoint URL) and Port number. Enter the Username and Password you received in your confirmation email from Perspectium Support in Step #6. If you didn't receive this email, contact Perspectium Support.
![]() NOTE: If you opted to use an existing RDS in Step #3, you must update or create a database user in your RDS database with the Username of admin and Password of adminadmin.
NOTE: If you opted to use an existing RDS in Step #3, you must update or create a database user in your RDS database with the Username of admin and Password of adminadmin.
Enter this information into the appropriate fields and then click Sign In to finish connecting your Tableau workbook to your AWS RDS. Five preconfigured Tableau dashboards will then populate with the incident data that was bulk migrated from your ServiceNow instance to your AWS RDS.
![]() NOTE: If connecting to an Oracle database, enter pspdb in the SID field.
NOTE: If connecting to an Oracle database, enter pspdb in the SID field.
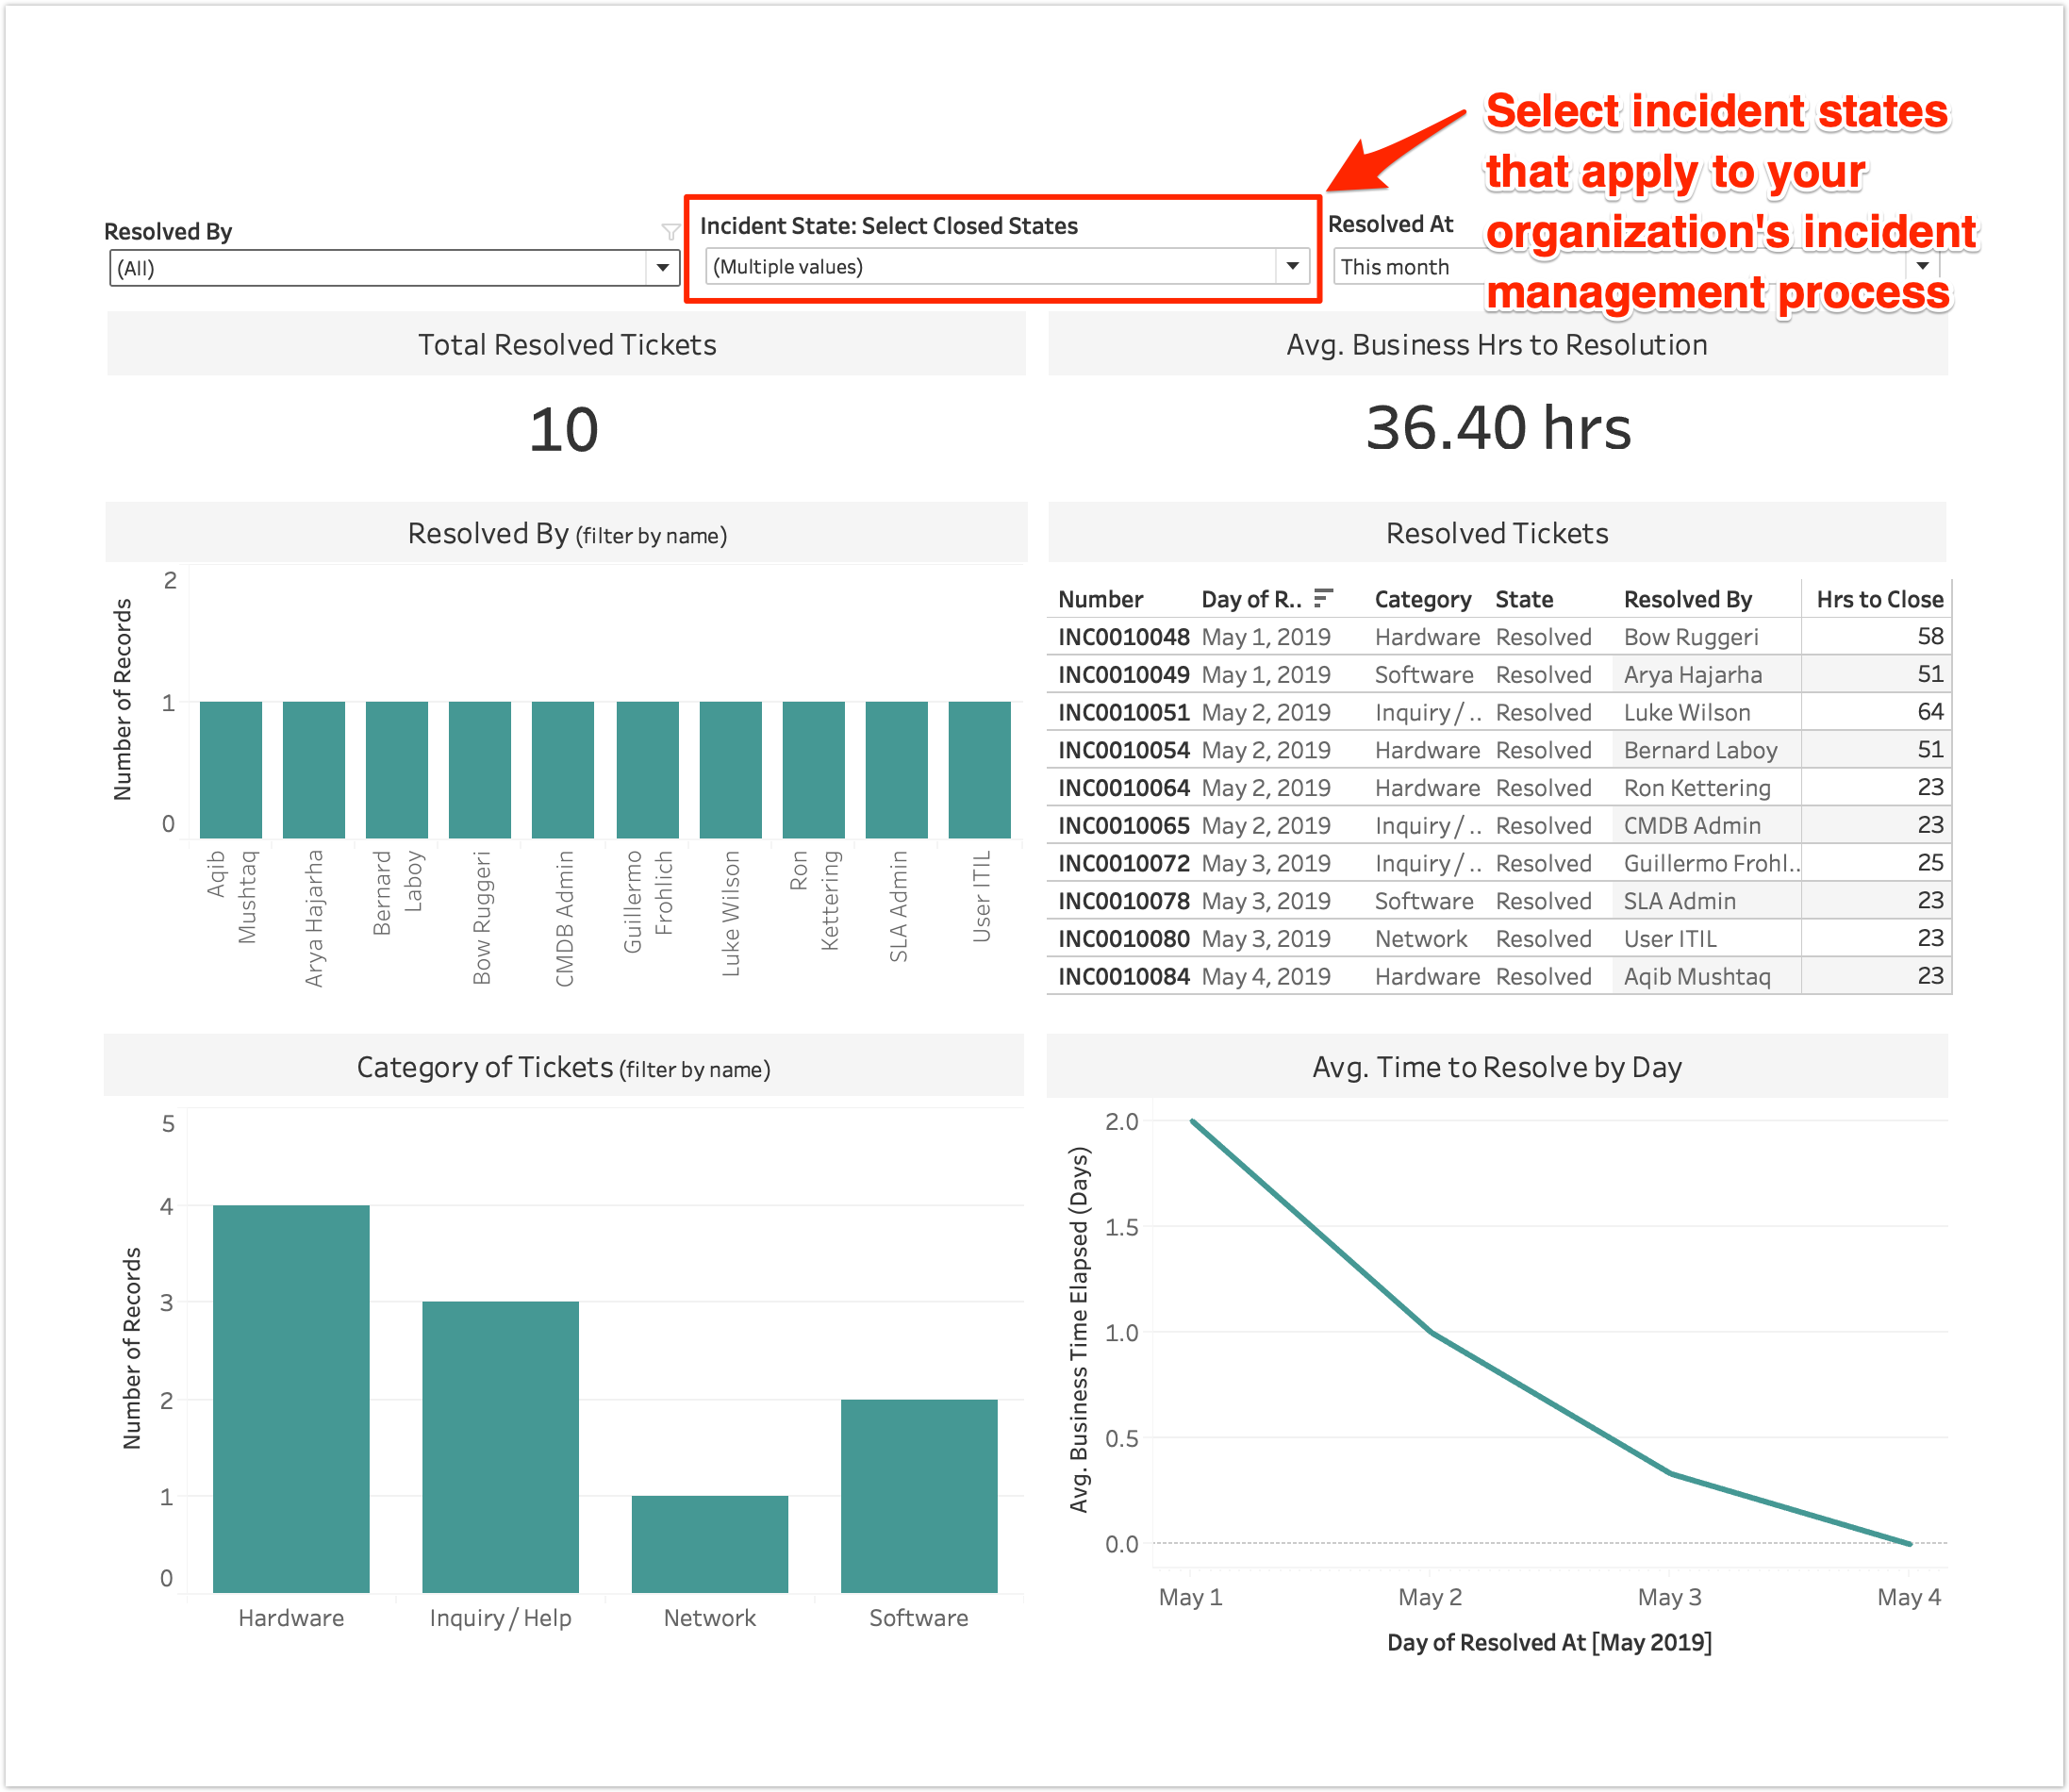
Choose Open and Resolved incident types
Click the Open and New Incidents dashboard. Then go to Incident State: Select Open States and check all options that apply to Open states for incidents per your organization's incident management process. Then, click the Resolved Incidents dashboard, go to Incident State: Select Closed States and check all options that apply to Resolved per your organization's incident management process.
View Perspectium Incident Analytics dashboards
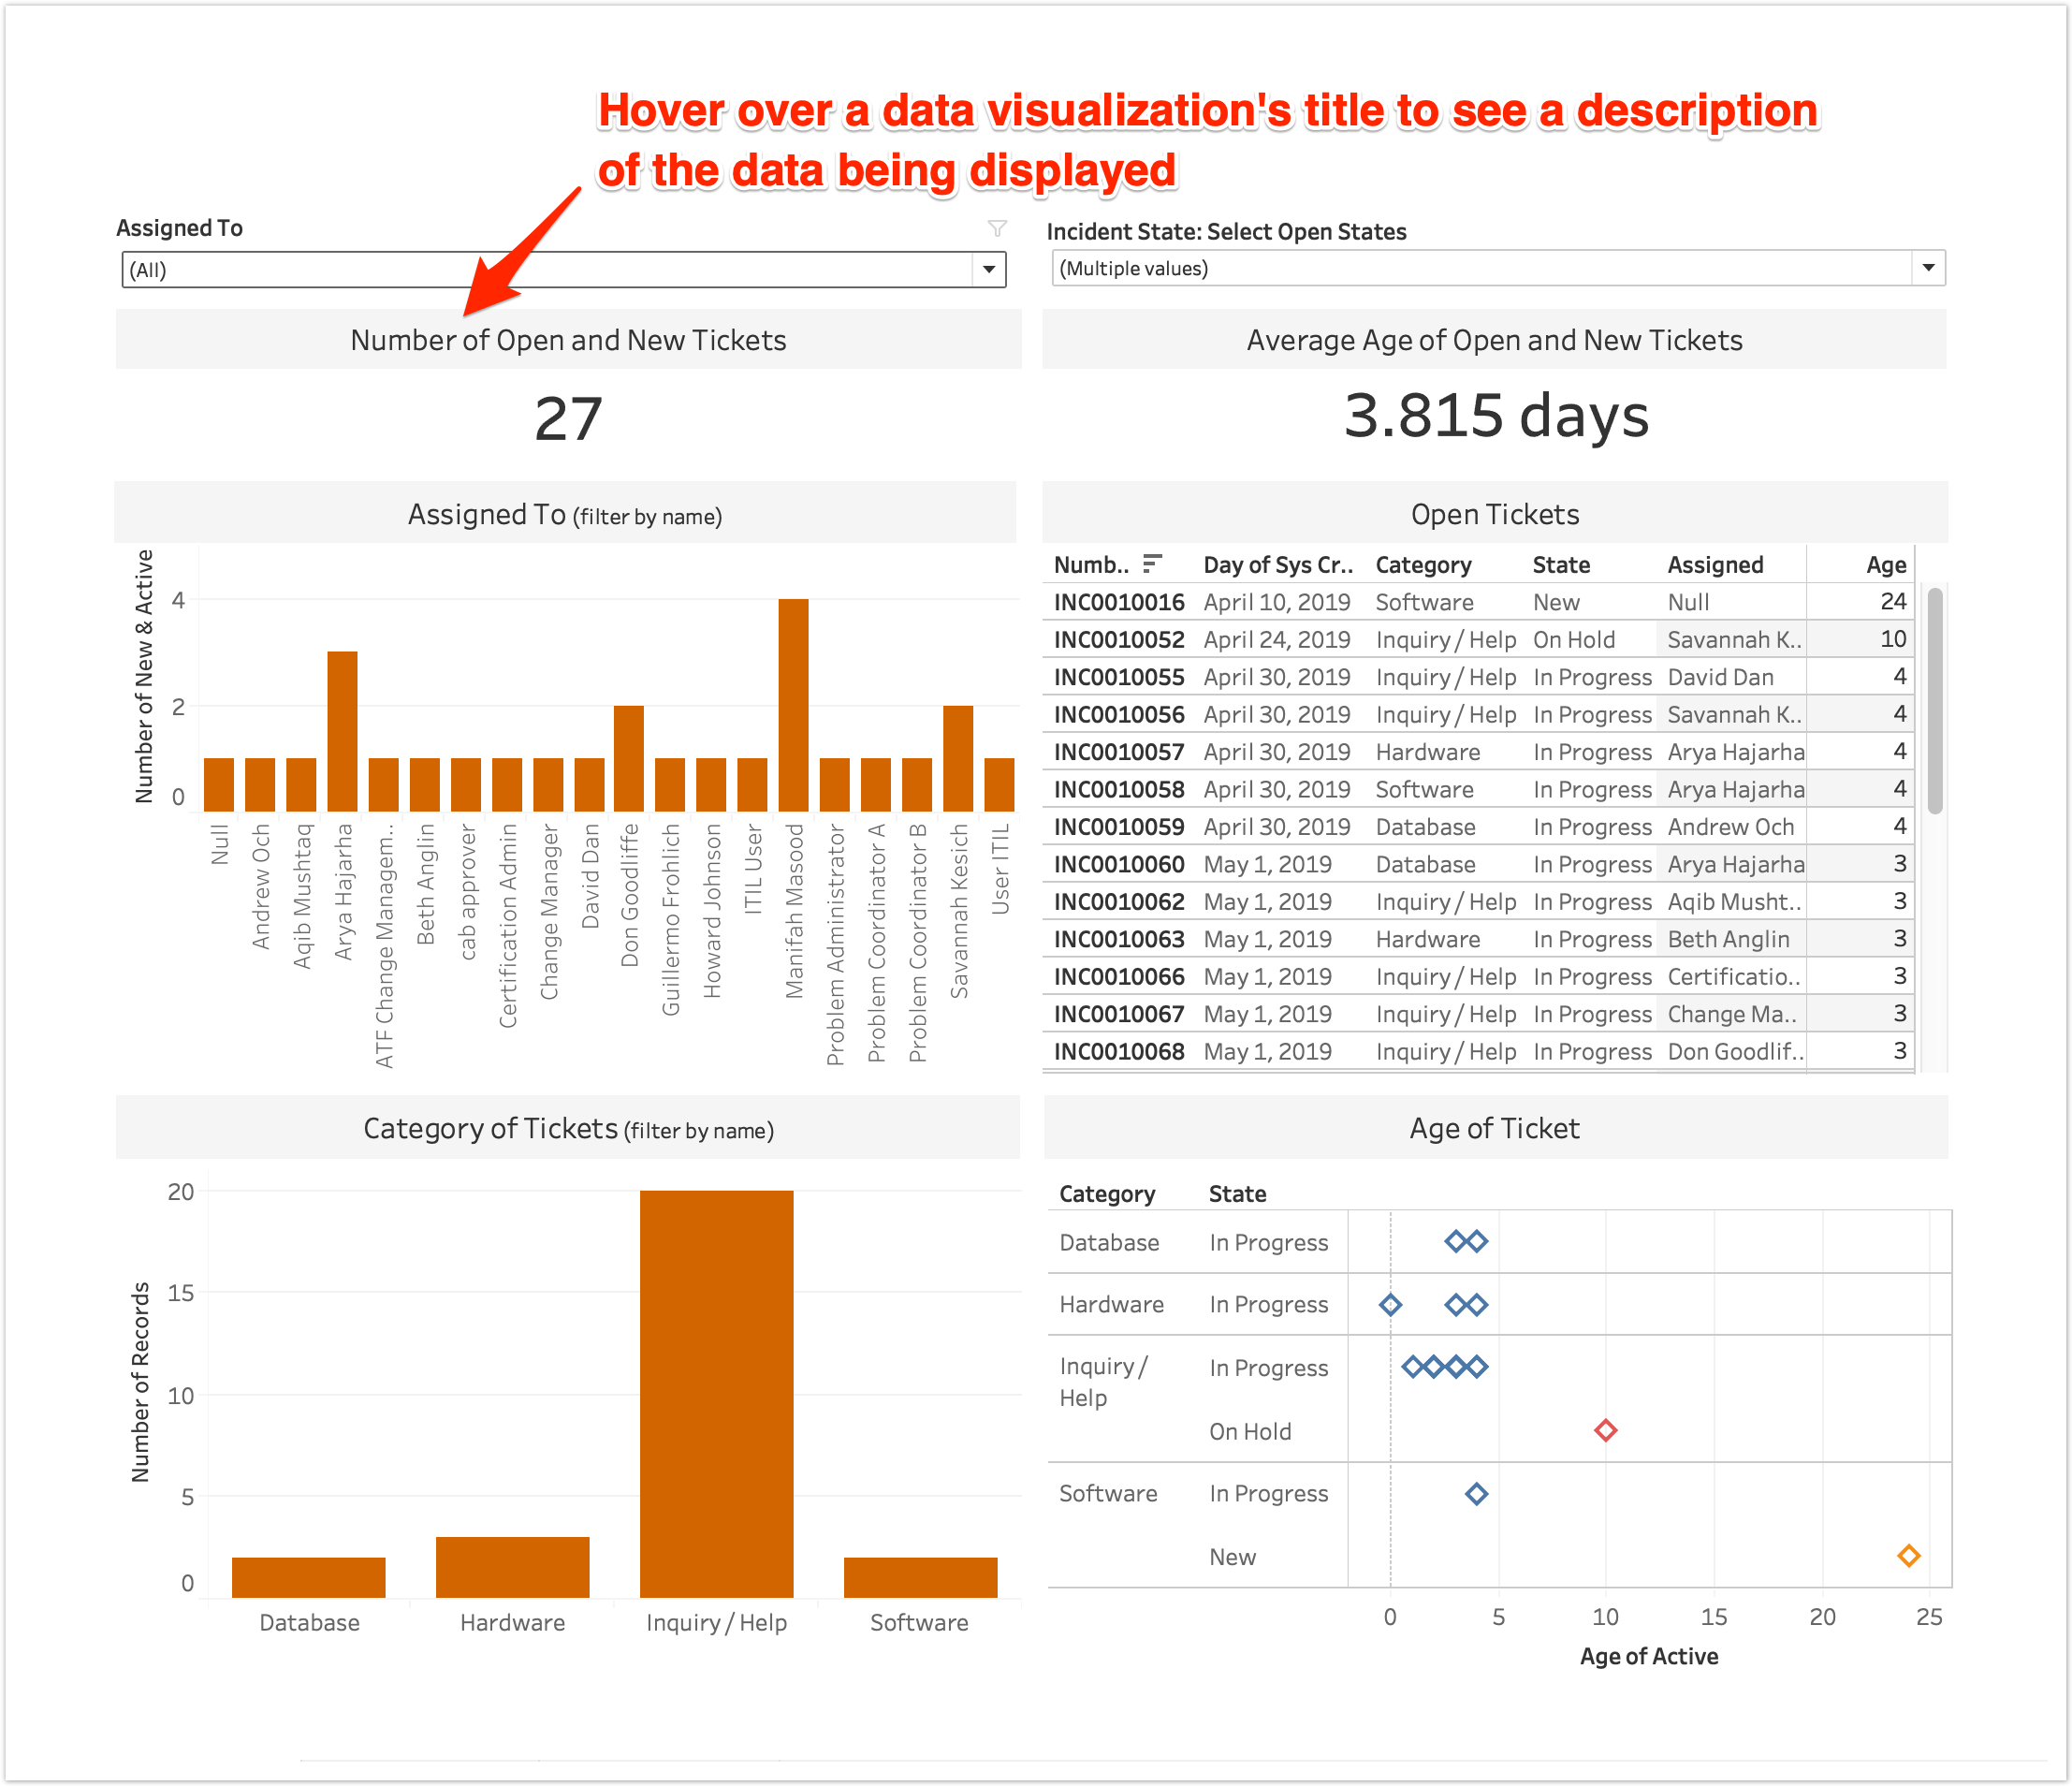
Perspectium's preconfigured Incident Analytics dashboards provide you with a variety of data visualizations for the incidents managed by your organization, including:
| Visualization | Description |
|---|---|
| Avg Hours to Close | Displays the time that the incidents were closed on and the average number of hours to close |
| Volume of incidents | Displays the volume of incidents per hour |
| Resolved by | Displays the magnitude of the number of incidents that a user resolved. |
| Category of incidents | Displays the number of incidents per category |
| Assigned to | Displays the number of open incidents assigned to a user. Click on a user to filter all charts by name |
| Age of Incident | Displays how long an incident has been open (in days) along with the category and current state |
![]() NOTE: To learn more about each Incident Analytics data visualization, hover over the title for a visualization to see its description.
NOTE: To learn more about each Incident Analytics data visualization, hover over the title for a visualization to see its description.
Try out Perspectium On-demand DataSync
If you are new to Perspectium, browse through other DataSync for ServiceNow topics to find out more about how to leverage the power to sync, transform, and visualize your ServiceNow data in various other data stores.