Page History
DataSync Snapshot reliably, comprehensively backs up ServiceNow objects and data without impacting performance, and all from within the Perspectium DataSync application.
Once you have created and executed a backup, you will have the option to restore the records in the selected table(s) in your ServiceNow instance or another ServiceNow instance.
![]() NOTE: You will need to have MBS 3.0 to properly run backup and restore. For more information, contact Perspectium Support.
NOTE: You will need to have MBS 3.0 to properly run backup and restore. For more information, contact Perspectium Support.
| Divbox | ||||||||
|---|---|---|---|---|---|---|---|---|
| ||||||||
Contents
|
Prerequisites
![]() You will need the following information from Perspectium Support:
You will need the following information from Perspectium Support:
- Perspectium Integration Mesh (MBS) server URL
- Integration Mesh (MBS) vhost
- Integration Mesh (MBS) username
- Integration Mesh (MBS) password
![]() Then, you will first need to install the Perspectium application into your ServiceNow instance by installing update sets in the following order::
Then, you will first need to install the Perspectium application into your ServiceNow instance by installing update sets in the following order::
- Perspectium Core update set
- Perspectium Snapshot update set
Follow the link to Get Started with DataSync for ServiceNow.
Initial Setup
Before you begin, you will need set up initial configurations in Perspectium's General Settings:
| UI Expand | ||||||||||||||||
|---|---|---|---|---|---|---|---|---|---|---|---|---|---|---|---|---|
| ||||||||||||||||
|
Upgrading a ServiceNow application
Learn how to setup and execute backup to prepare your ServiceNow instance for an upgrade.
| style | background:white; |
|---|
General Configurations
| UI Expand | |||||||||||||||||||||||||||||||||||
|---|---|---|---|---|---|---|---|---|---|---|---|---|---|---|---|---|---|---|---|---|---|---|---|---|---|---|---|---|---|---|---|---|---|---|---|
| |||||||||||||||||||||||||||||||||||
Once the tables are backed up, you can upgrade the application. Let’s say something went wrong or the upgrade removed a core functionality, time to restore that backup! UI Expand | | ||||||||||||||||||||||||||||||||||
| |||||||||||||||||||||||||||||||||||
| Divbox | |||||||||||||||||||||||||||||||||||
|
| Divbox | ||
|---|---|---|
| ||
|
| UI Step |
|---|
Log into your ServiceNow instance and navigate to Perspectium > Snapshot > Snapshot. |
| UI Step |
|---|
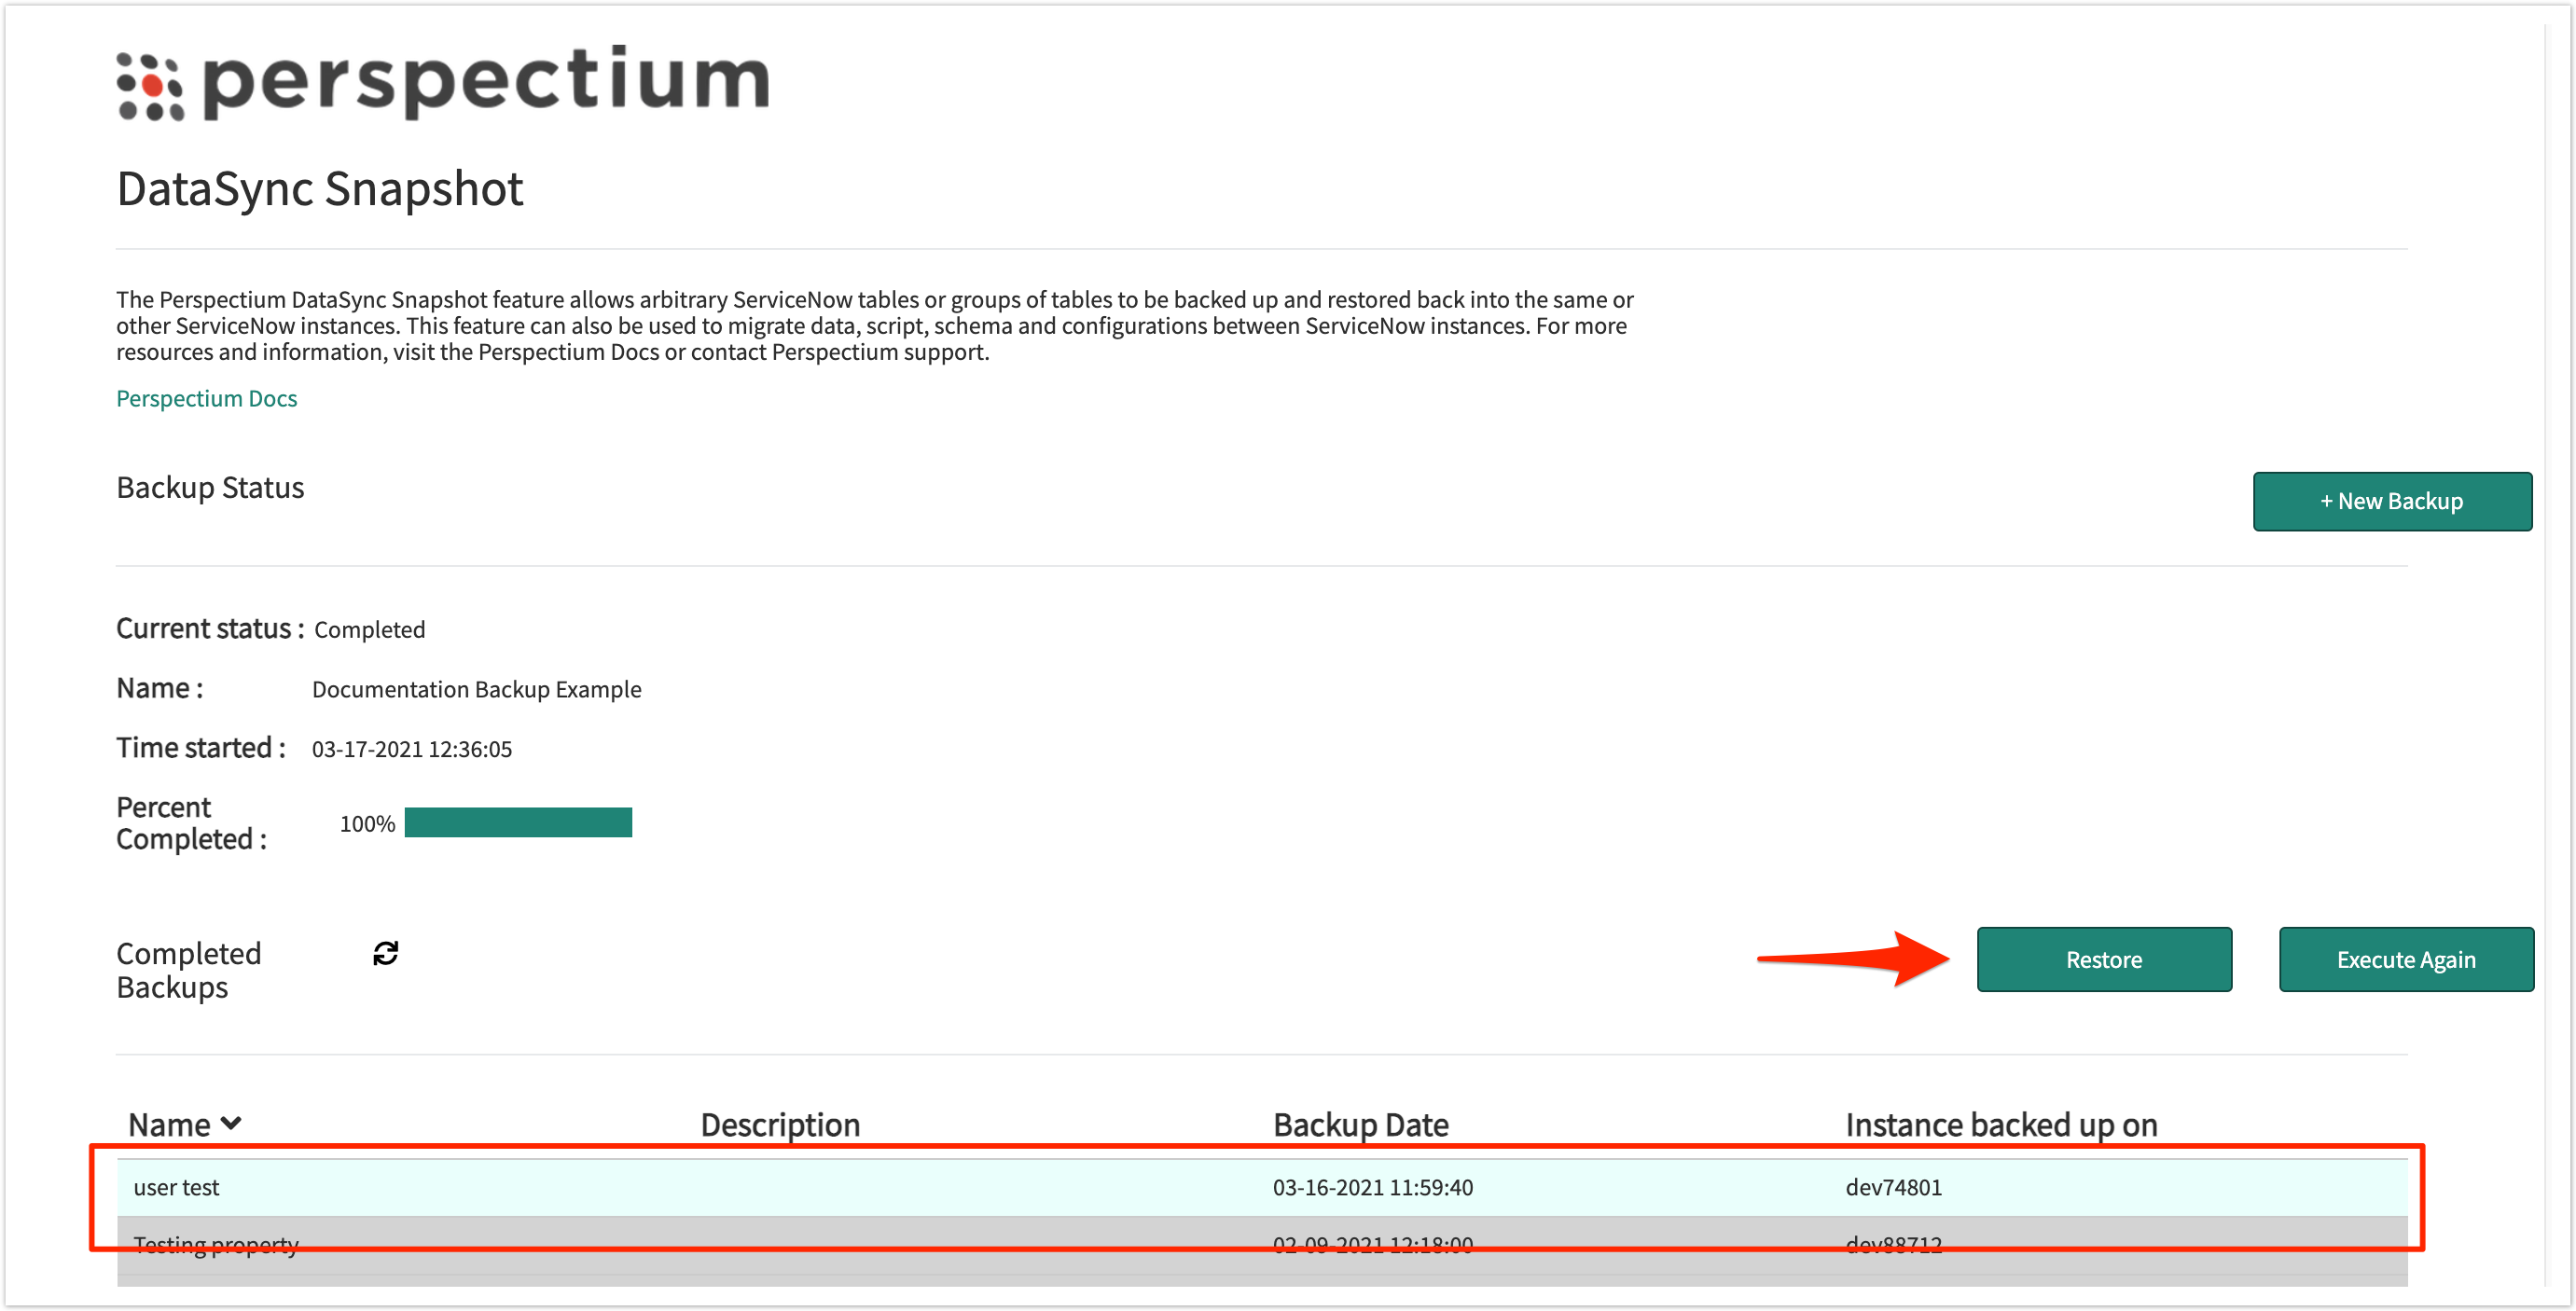
Select the completed back up you want to restore. Then, click Restore. You will be prompted to continue and click Ok. Once restore is complete, your ServiceNow instance will start receiving inbound messages (Perspectium > Messages > Inbound) and the restored records in the selected table(s) will appear in your instance. |
Upgrading across different instances
Learn how to backup and restore table(s) when upgrading your application across different instances.
![]() NOTE: Before you begin, validate that you have the same Integration Mesh credentials across the different instances.
NOTE: Before you begin, validate that you have the same Integration Mesh credentials across the different instances.
| ||||||||||||||||||||||||||||||||
| Divbox | ||||||||||||||||||||||||||||||||
|---|---|---|---|---|---|---|---|---|---|---|---|---|---|---|---|---|---|---|---|---|---|---|---|---|---|---|---|---|---|---|---|---|
| ||||||||||||||||||||||||||||||||
In cases where you have two instances, i.e. one test environment and one development environment, and you want to upgrade the test environment, you will need to execute a backup
|
| UI Expand | ||||||||||||||||||||||||||||||||
|---|---|---|---|---|---|---|---|---|---|---|---|---|---|---|---|---|---|---|---|---|---|---|---|---|---|---|---|---|---|---|---|---|
| Create
| in the test environment|||||||||||||||||||||||||||||||
|
| UI Expand | |||||||||||||||||||
|---|---|---|---|---|---|---|---|---|---|---|---|---|---|---|---|---|---|---|---|
| |||||||||||||||||||
|
Upgrading a ServiceNow application
Learn how to setup and execute backup to prepare your ServiceNow instance for an upgrade.
| Divbox | |||||||||||||||||||||||||||||||||||||
|---|---|---|---|---|---|---|---|---|---|---|---|---|---|---|---|---|---|---|---|---|---|---|---|---|---|---|---|---|---|---|---|---|---|---|---|---|---|
| |||||||||||||||||||||||||||||||||||||
Before you upgrade your application, you will need to back up the tables in your ServiceNow instance.
Let's say you now you wanted to upgrade development environment as well, but mid-upgrade, you decided not to do so. You can restore the backup from the test environment to the developer environment.
|
Scheduling backups
Learn how to schedule a backup in your ServiceNow instance.
| style | background:white; |
|---|
To prepare for cases where you are experiencing technical difficulties in your ServiceNow instance, i.e. environment breaks, you can set a scheduled backup.
| title | Set up a monthly backup |
|---|
| style | background:white; |
|---|
| size | small |
|---|
| UI Step |
|---|
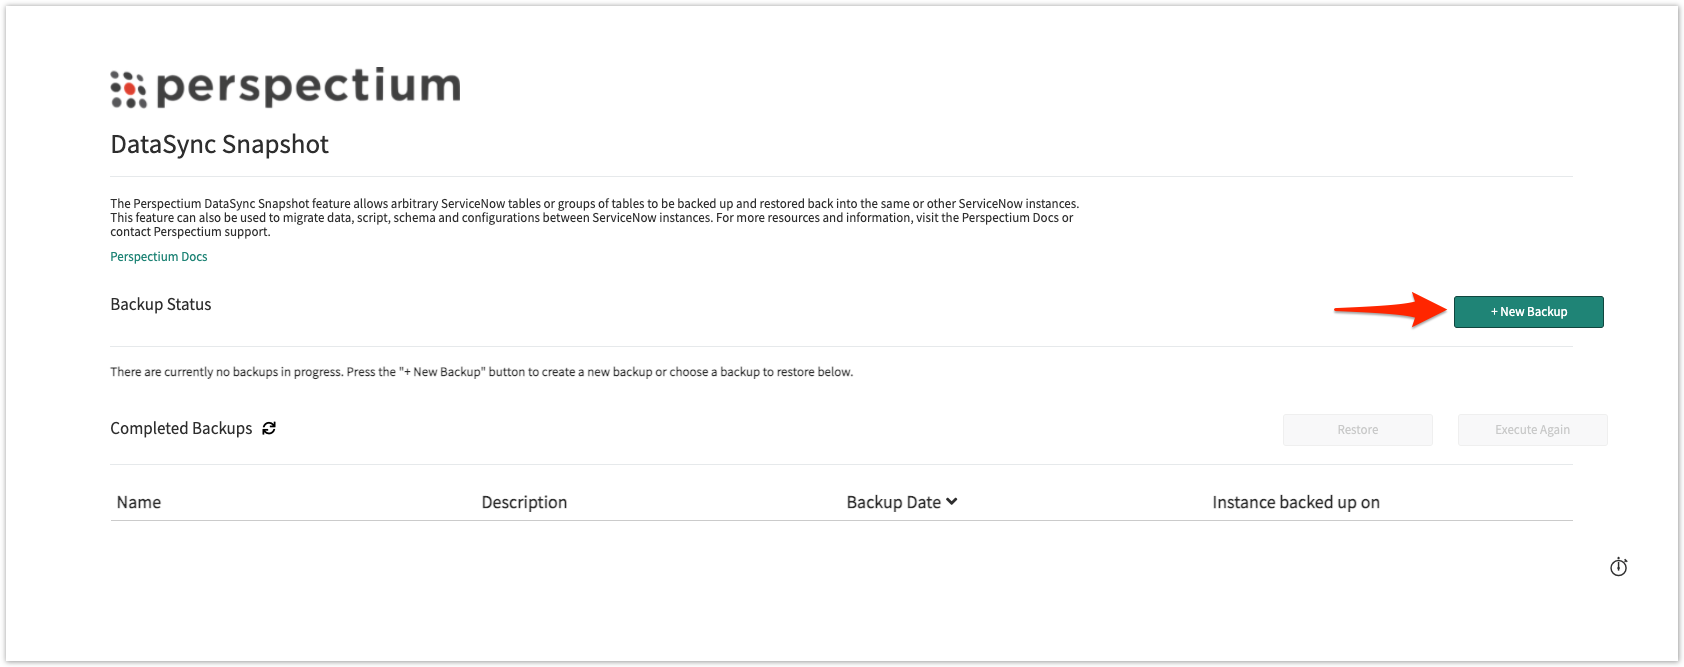
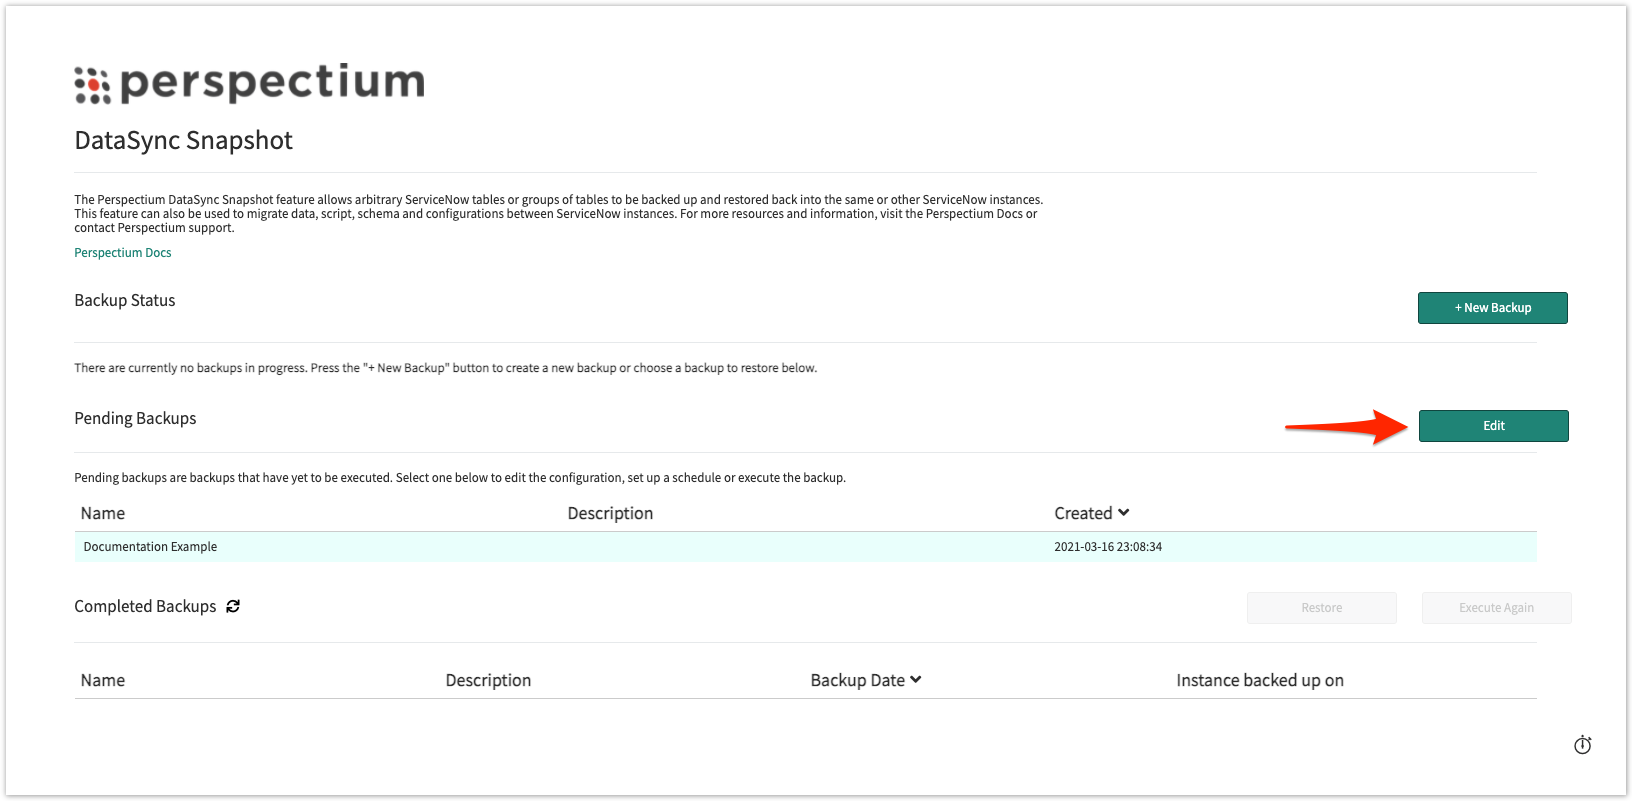
Log into your ServiceNow instance and navigate to Perspectium > DataSync > Snapshot. |
| UI Step |
|---|
Next click + New Backup. |
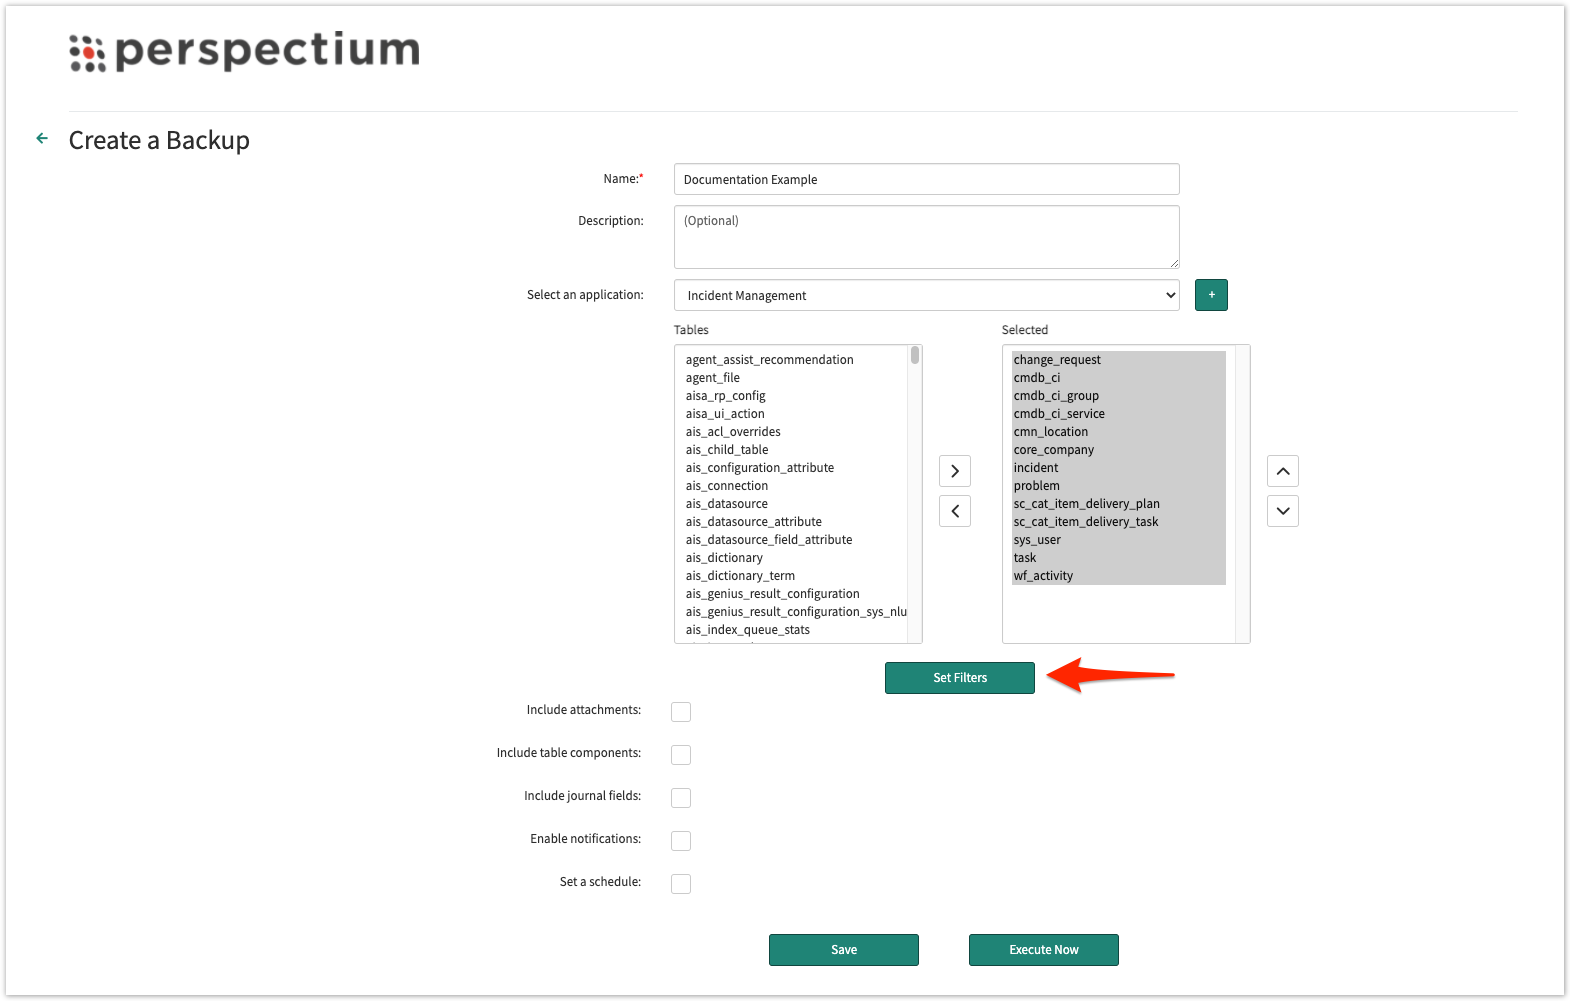
Fill in the required fields:
| style | background:white; |
|---|
| size | small |
|---|
| UI Step |
|---|
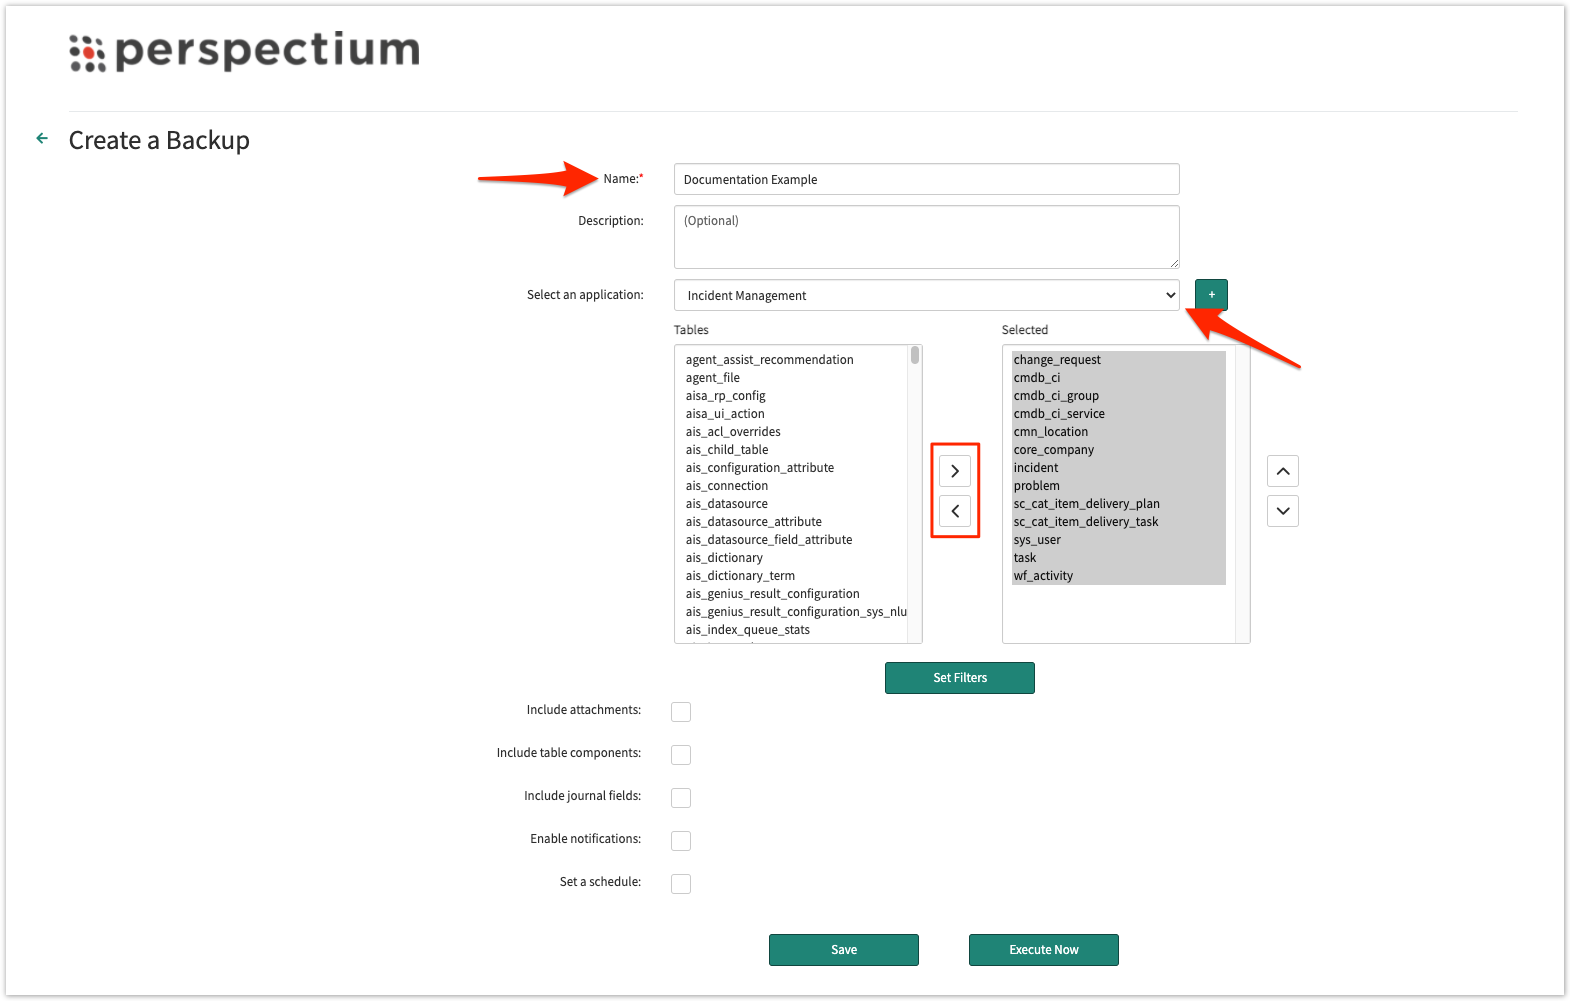
Fill in the Name field with the desired name of the backup. |
| UI Step |
|---|
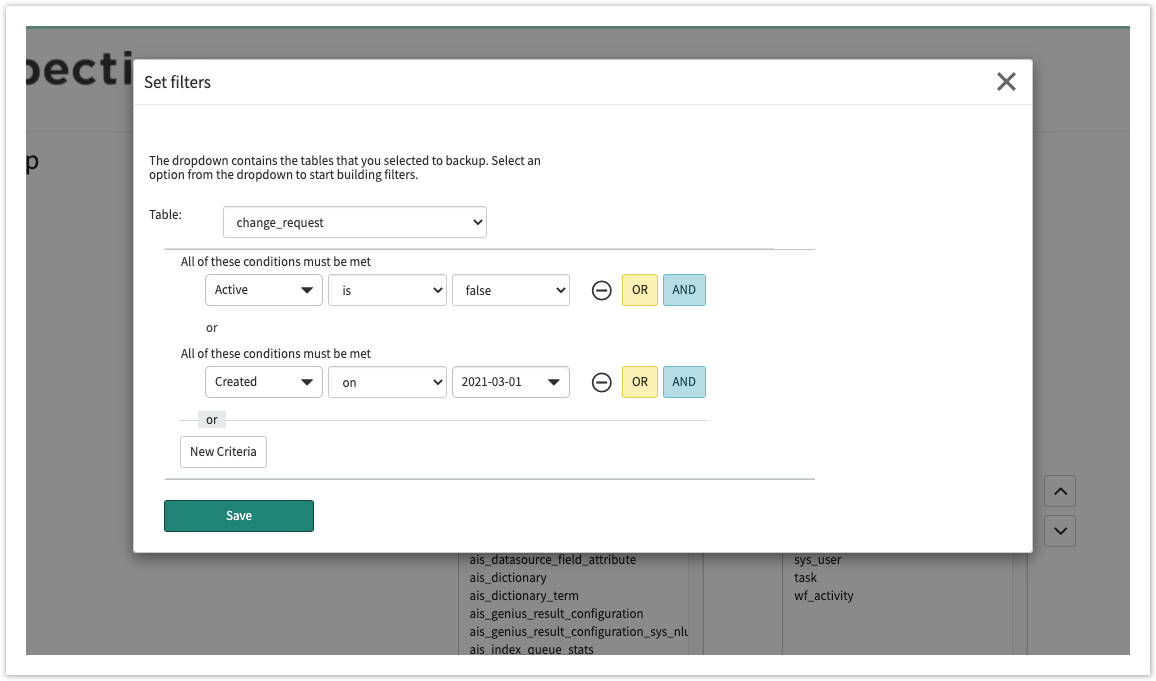
Within the Select an application section, choose the tables you want to backup. You can either pick tables manually from the Tables list or select an application which contains a set list of tables to backup.
(Optionally) If you manually chose tables, you can save those selected tables as a custom application template with the + button next to the dropdown. |
Enable backup on related tables:
| style | background:white; |
|---|
| size | small |
|---|
| UI Step |
|---|
To backup attachments (sys_attachment and sys_attachment_doc) for the tables selected, enable Include attachments. |
| UI Step |
|---|
Enable Include table components to backup all the related components needed for the selected table(s). Selecting this option will only select records related to your select tables from the following system tables:
|
| UI Step |
|---|
To backup journal field (sys_journal_field) records related to the tables selected, enable Include journal fields. |
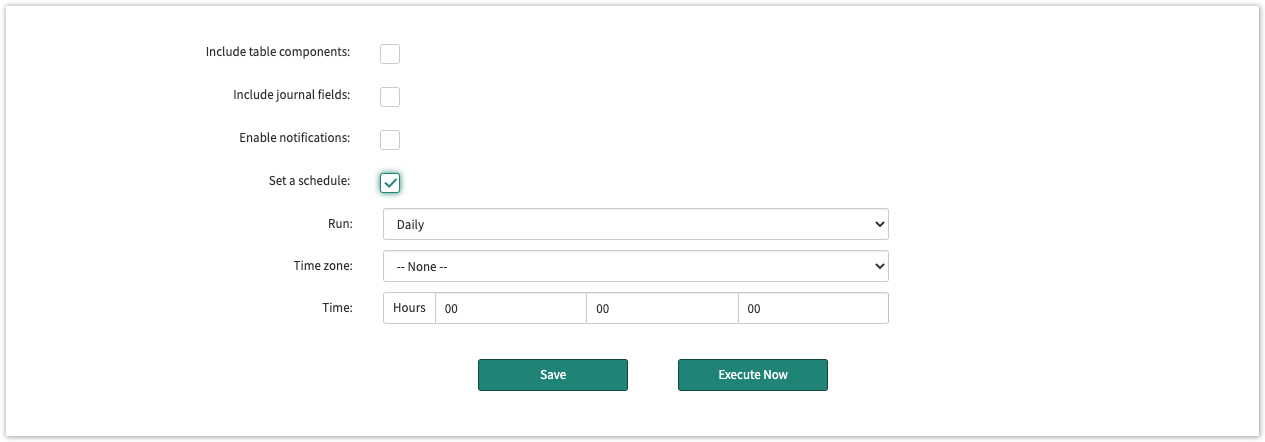
| UI Step |
|---|
Check Set a schedule. Once activated, you can choose when to run the schedule in the Run dropdown. In this case we've chosen Monthly to have a backup executed every month from this point forward. |
| UI Step |
|---|
Click Save. |
Once you experience an issue, i.e. environment breaks, and you feel the need to restore previous table(s), you can restore the latest backup.
Once the tables are backed up, you can upgrade the application. Let’s say something went wrong or the upgrade removed a core functionality, time to restore that backup!
|
Upgrading across different instances
Learn how to backup and restore table(s) when upgrading your application across different instances.
![]() NOTE: Before you begin, validate that you have the same Integration Mesh credentials across the different instances.
NOTE: Before you begin, validate that you have the same Integration Mesh credentials across the different instances.
| Divbox | ||||||||||||||||||||
|---|---|---|---|---|---|---|---|---|---|---|---|---|---|---|---|---|---|---|---|---|
| ||||||||||||||||||||
In cases where you have two instances, i.e. one test environment and one development environment, and you want to upgrade the test environment, you will need to execute a backup.
|
General Configurations
| ||||||||||||||||||||||||||||||||||||||||||||||||||||||||||||||||||||||||||||||||
| UI Expand | ||||||||||||||||||||||||||||||||||||||||||||||||||||||||||||||||||||||||||||||||
|---|---|---|---|---|---|---|---|---|---|---|---|---|---|---|---|---|---|---|---|---|---|---|---|---|---|---|---|---|---|---|---|---|---|---|---|---|---|---|---|---|---|---|---|---|---|---|---|---|---|---|---|---|---|---|---|---|---|---|---|---|---|---|---|---|---|---|---|---|---|---|---|---|---|---|---|---|---|---|---|---|
| title | Create a backup
Let's say you now you wanted to upgrade development environment as well, but mid-upgrade, you decided not to do so. You can restore the backup from the test environment to the developer environment.
|
Scheduling backups
Learn how to schedule a backup in your ServiceNow instance.
| Divbox | |||||||||||||||||||||||||||||||||||||||
|---|---|---|---|---|---|---|---|---|---|---|---|---|---|---|---|---|---|---|---|---|---|---|---|---|---|---|---|---|---|---|---|---|---|---|---|---|---|---|---|
| |||||||||||||||||||||||||||||||||||||||
To prepare for cases where you are experiencing technical difficulties in your ServiceNow instance, i.e. environment breaks, you can set a scheduled backup.
| |||||||||||||||||||||||||||||||||||||||
| UI Expand | |||||||||||||||||||||||||||||||||||||||
| |||||||||||||||||||||||||||||||||||||||
Once you experience an issue, i.e. environment breaks, and you feel the need to restore previous table(s), you can restore the latest backup. Divbox | | ||||||||||||||||||||||||||||||||||||||
| |||||||||||||||||||||||||||||||||||||||
| UI Steps | |||||||||||||||||||||||||||||||||||||||
|
| UI Step |
|---|
Log into your ServiceNow instance and navigate to Perspectium > Snapshot > Snapshot. |
| UI Step |
|---|
Under Pending Backups, select the backup you want to execute. Then, click Edit.
|
| UI Step |
|---|
On the bottom of the page, click Execute Now. |
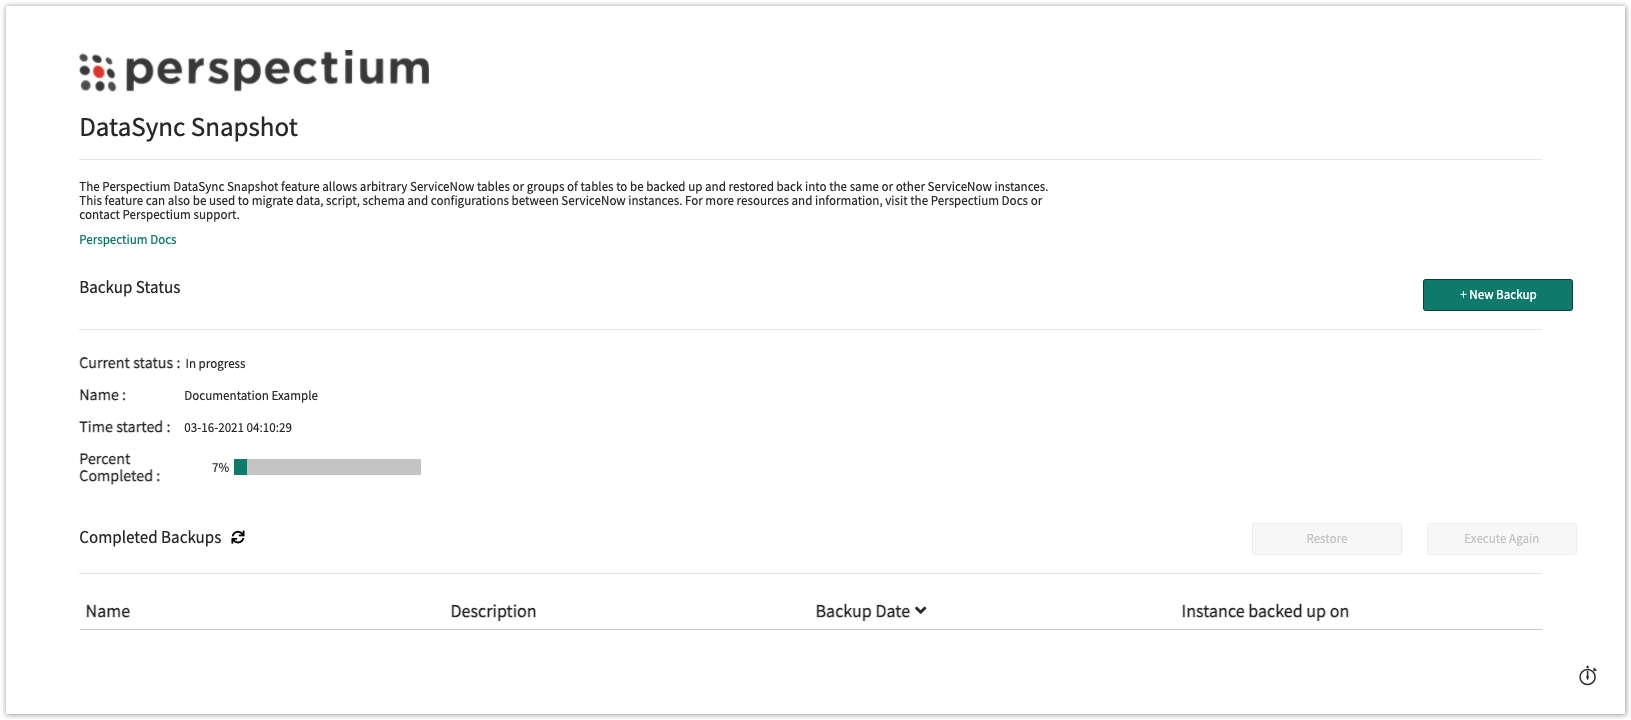
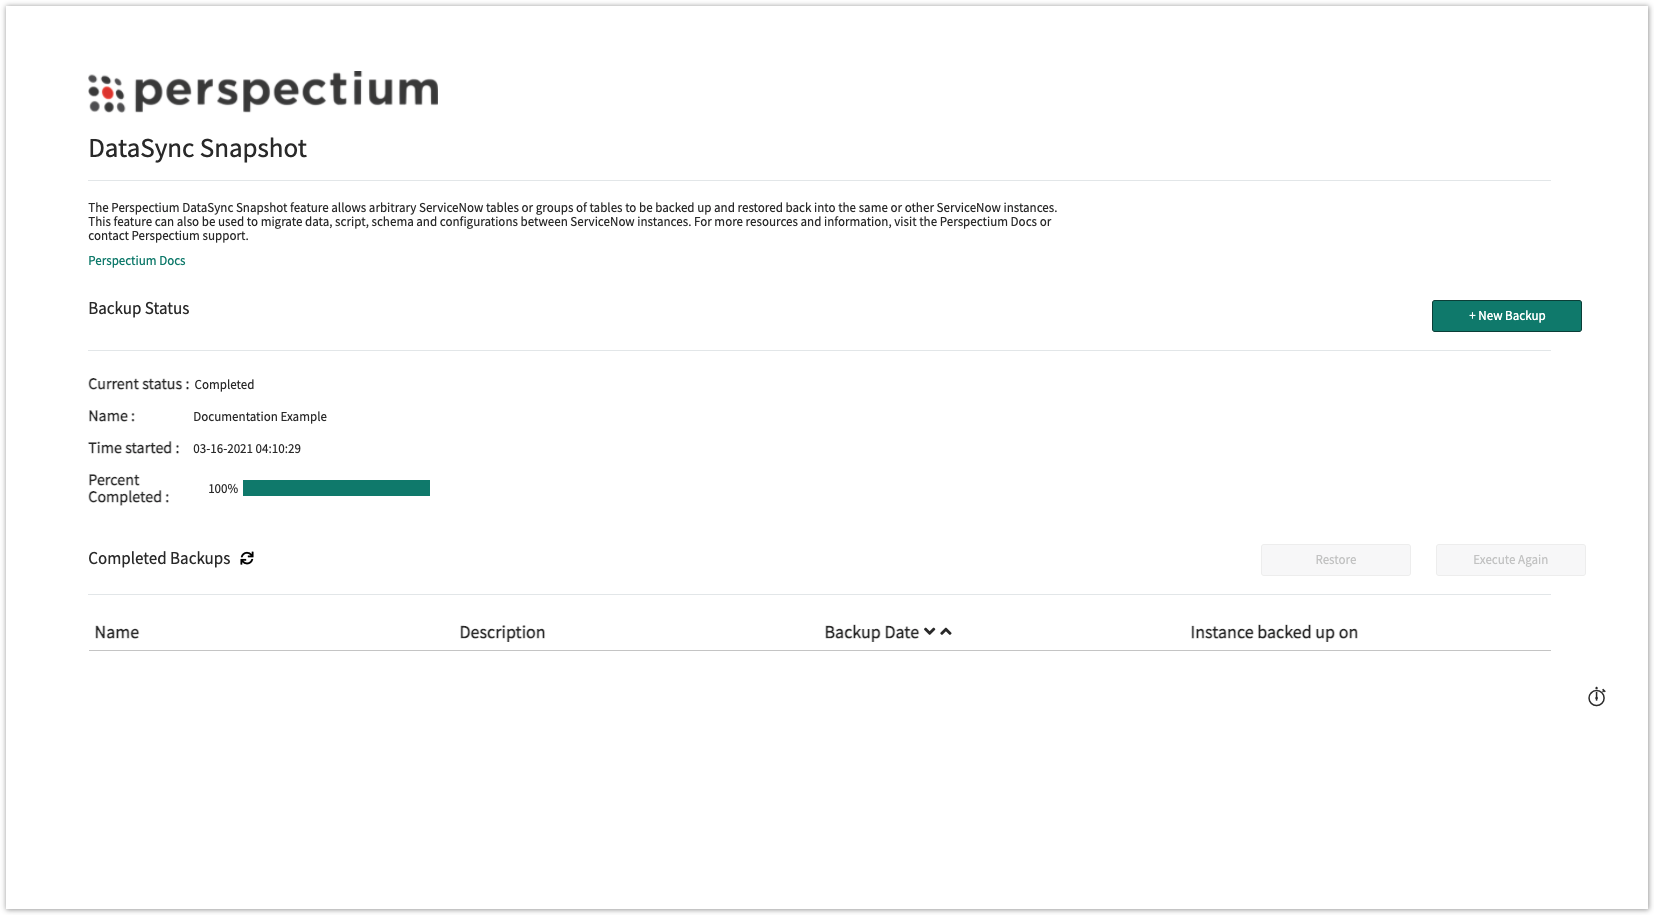
(Optional) Navigate back to Snapshot. Under the Backup Status section, monitor the status of your backup.
| UI Expand | ||
|---|---|---|
|
| |||||||||||||||||||||||||
|