DataSync Snapshot reliably, comprehensively backs up ServiceNow objects and data without impacting performance, and all from within the Perspectium DataSync application.
Once you have created and executed a backup, you will have the option to restore the records in the selected table(s) in your ServiceNow instance or another ServiceNow instance.
![]() NOTE: You will need to have MBS 3.0 to properly run backup and restore. For more information, contact Perspectium Support.
NOTE: You will need to have MBS 3.0 to properly run backup and restore. For more information, contact Perspectium Support.
Prerequisites
![]() You need the following information from Perspectium Support:
You need the following information from Perspectium Support:
- Perspectium Integration Mesh (MBS) server URL
- Integration Mesh (MBS) vhost
- Integration Mesh (MBS) username
- Integration Mesh (MBS) password
![]() Then, you need to install the Perspectium application into your ServiceNow instance by installing update sets in the following order:
Then, you need to install the Perspectium application into your ServiceNow instance by installing update sets in the following order:
- Perspectium Core update set
- Perspectium Snapshot update set
Follow the link to Get Started with DataSync for ServiceNow.
Initial Setup
Before you begin, you will need set up initial configurations in Perspectium's General Settings:
Log into your ServiceNow instance and navigate to Perspectium > Control and Configuration > Properties or simply type Control and Configuration in the Filter Navigator on the upper left-hand side of the screen. and then click Properties.
Then, click General Settings.
Type your Perspectium Integration Mesh username, password, and server URL in the appropriate fields.
![]() NOTE: In the username field, you will need to prepend the username with your vhost name, i.e. vhost/user.
NOTE: In the username field, you will need to prepend the username with your vhost name, i.e. vhost/user.
Then, scroll down to the bottom of the page and click Save.
If you will be restoring table(s) into another ServiceNow instance, repeat steps 1 and 2 with the same Integration Mesh (MBS) credentials in the other instance.
No valid Data Center license found
Please go to Atlassian Marketplace to purchase or evaluate Refined Toolkit for Confluence Data Center.Please read this document to get more information about the newly released Data Center version.
No valid Data Center license found
Please go to Atlassian Marketplace to purchase or evaluate Refined Toolkit for Confluence Data Center.Please read this document to get more information about the newly released Data Center version.
General Configurations
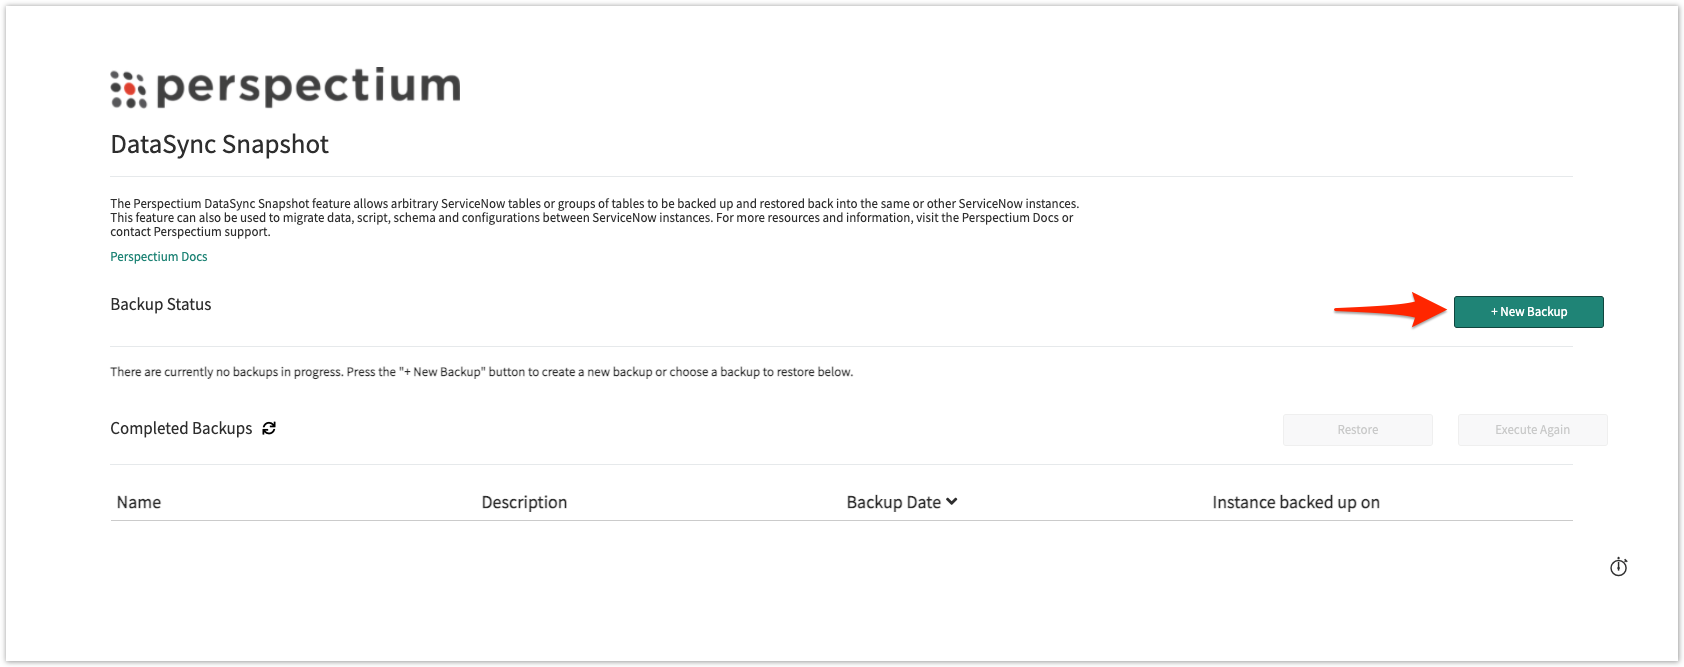
Log into your ServiceNow instance and navigate to Perspectium > DataSync > Snapshot or access through the Getting Started page.
Next click + New Backup.
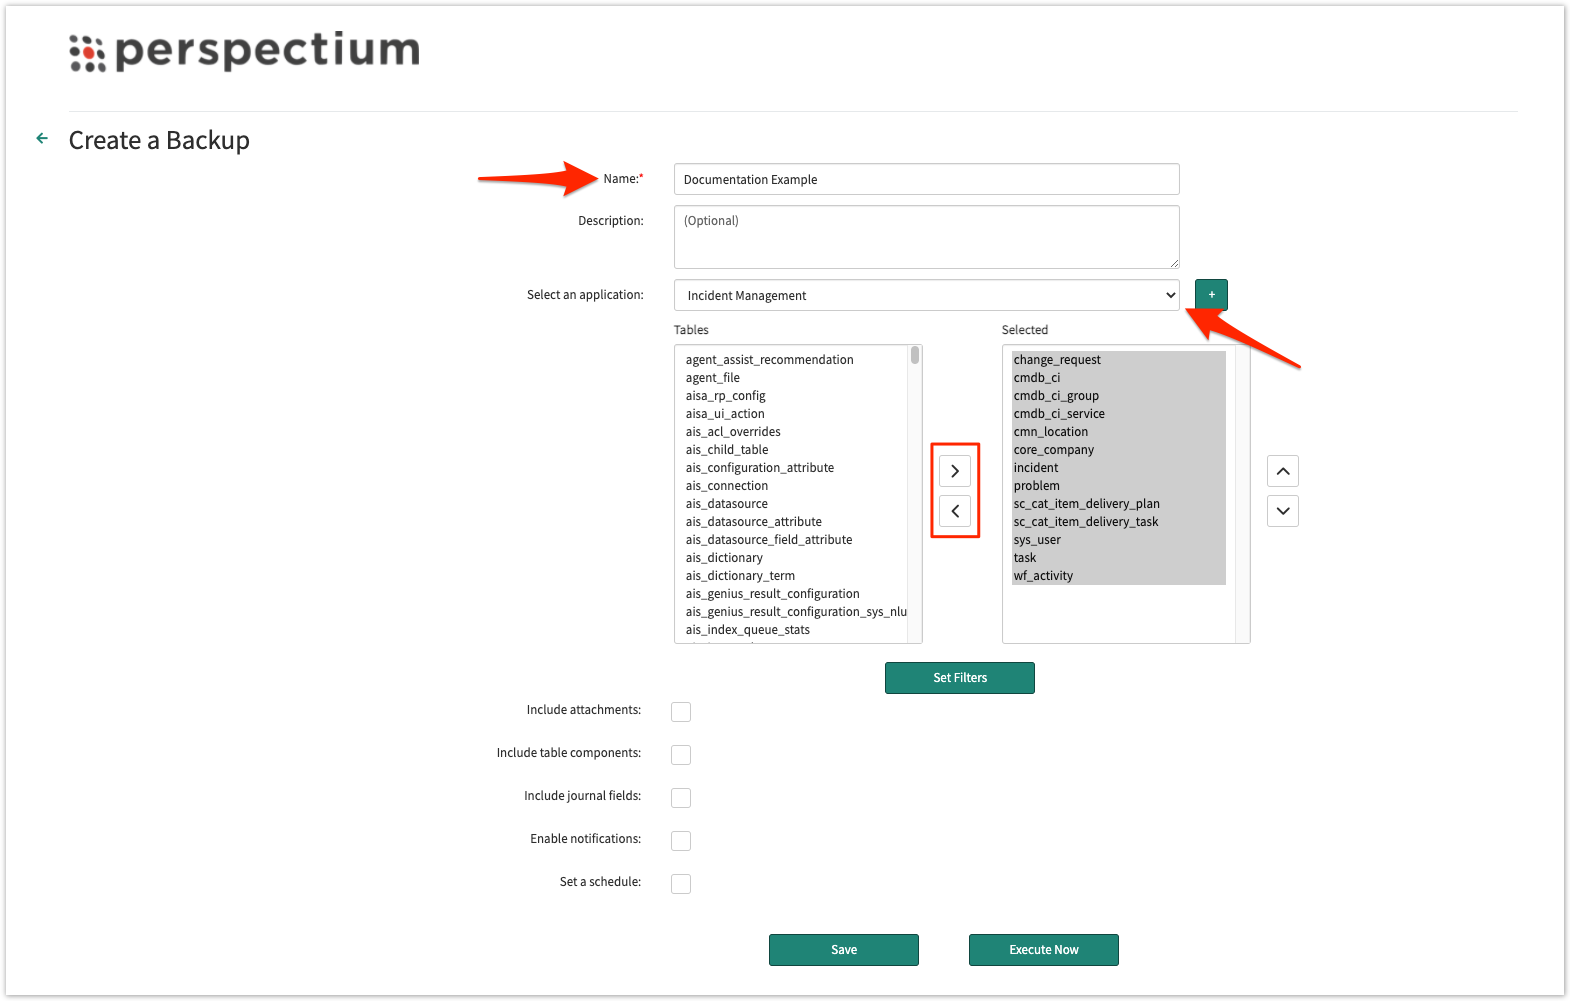
Fill in the required fields:
Fill in the Name field with the desired name of the backup.
Within the Select an application section, choose the tables you want to backup. You can either pick tables manually from the Tables list or select an application which contains a set list of tables to backup.
![]() NOTE: These application templates are tables available in the global scope.
NOTE: These application templates are tables available in the global scope.
(Optionally) If you manually chose tables, you can save those selected tables as a custom application template with the + button next to the dropdown.
The following application templates are currently available:
| Application | Tables |
|---|---|
| Incident Management | change_request cmdb_ci cmdb_ci_group cmdb_ci_service cmn_location core_company incident problem sc_cat_item_delivery_plan sc_cat_item_delivery_task sys_user task wf_activity |
| ITSM | change_task incident problem_task sysapproval_approver task_ci task_cmdb_ci_service task_sla |
| Catalog Tasks | cmdb_ci cmdb_ci_appl cmdb_ci_group cmdb_model core_company item_option_new pc_hardware_cat_item pc_software_cat_item sc_cat_item sc_cat_item_guide sc_category sc_req_item sc_request sc_task sys_plugins sys_user wf_activity wf_activity_definition wf_stage wf_workflow wf_workflow_version |
| Service Catalog | catalog_script_client catalog_ui_policy item_option_new item_option_new_set sc_cat_dt_app_group sc_cat_dt_app_user sc_cat_item sc_cat_item_category sc_cat_item_company_mtom sc_cat_item_company_no_mtom sc_cat_item_dept_mtom sc_cat_item_dept_no_mtom sc_cat_item_group_mtom sc_cat_item_group_no_mtom sc_cat_item_guide_items sc_cat_item_location_mtom sc_cat_item_location_no_mtom sc_cat_item_user_mtom sc_cat_item_user_no_mtom sc_category_location_no_mtom |
No valid Data Center license found
Please go to Atlassian Marketplace to purchase or evaluate Refined Toolkit for Confluence Data Center.Please read this document to get more information about the newly released Data Center version.
(Optional)
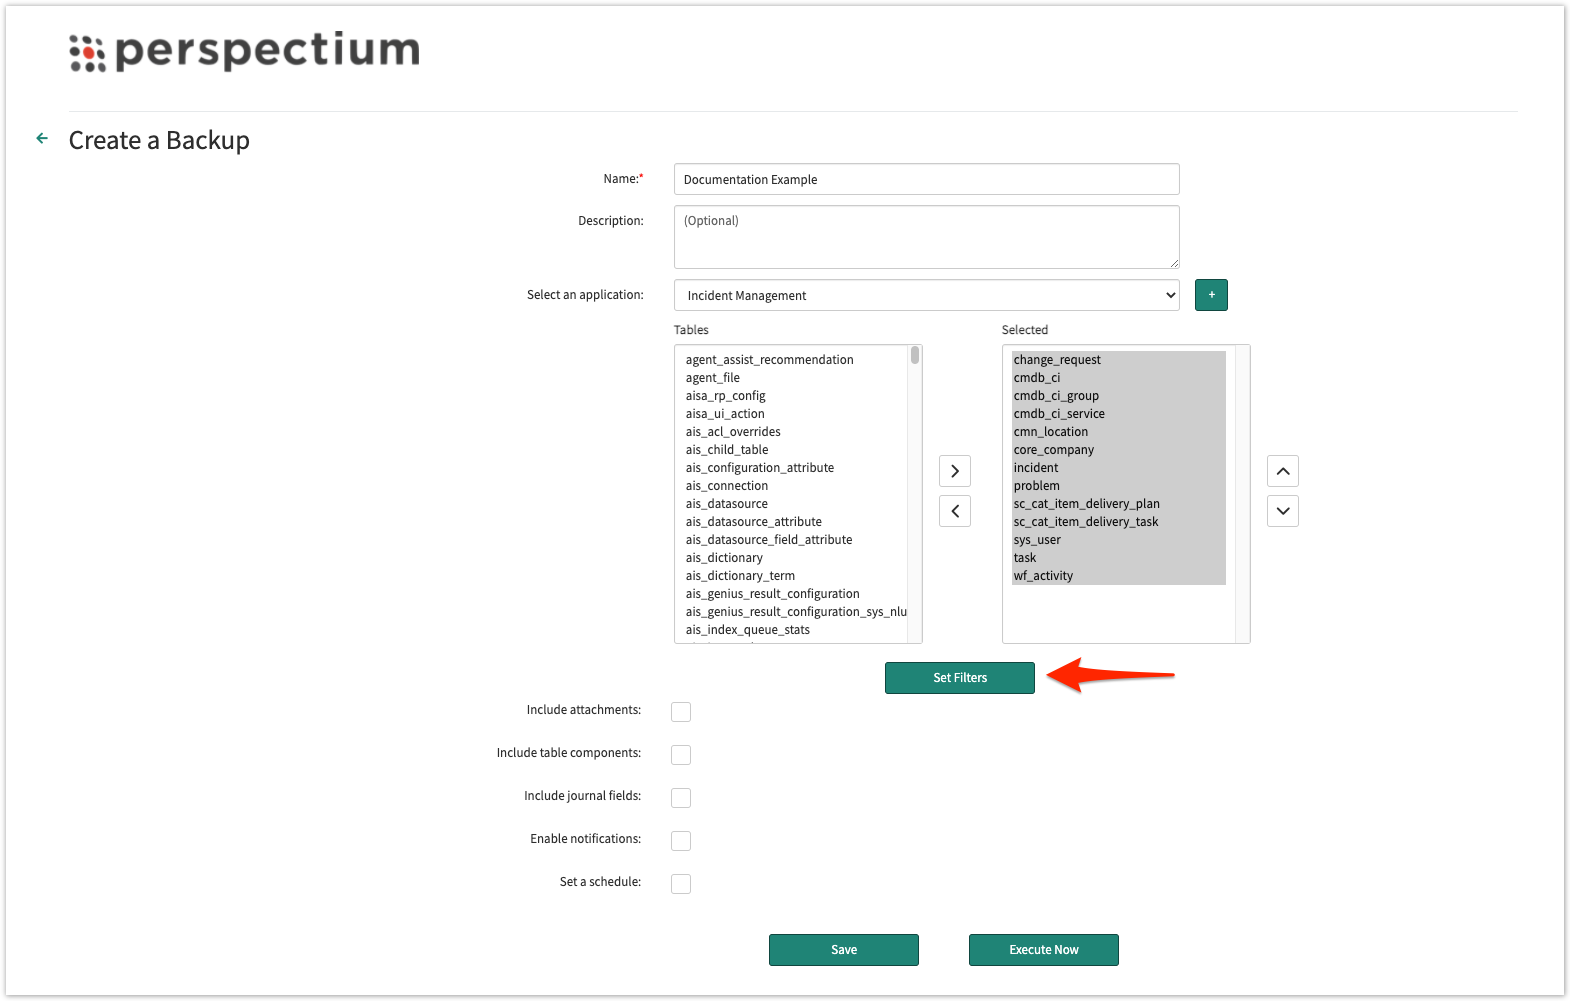
After selecting tables to backup, you have an option to apply conditions to tables that you want to back up. Without setting conditions, the entire tables will be backed up.
To apply conditions, click Set Filters below the Tables to set up your desired conditions.
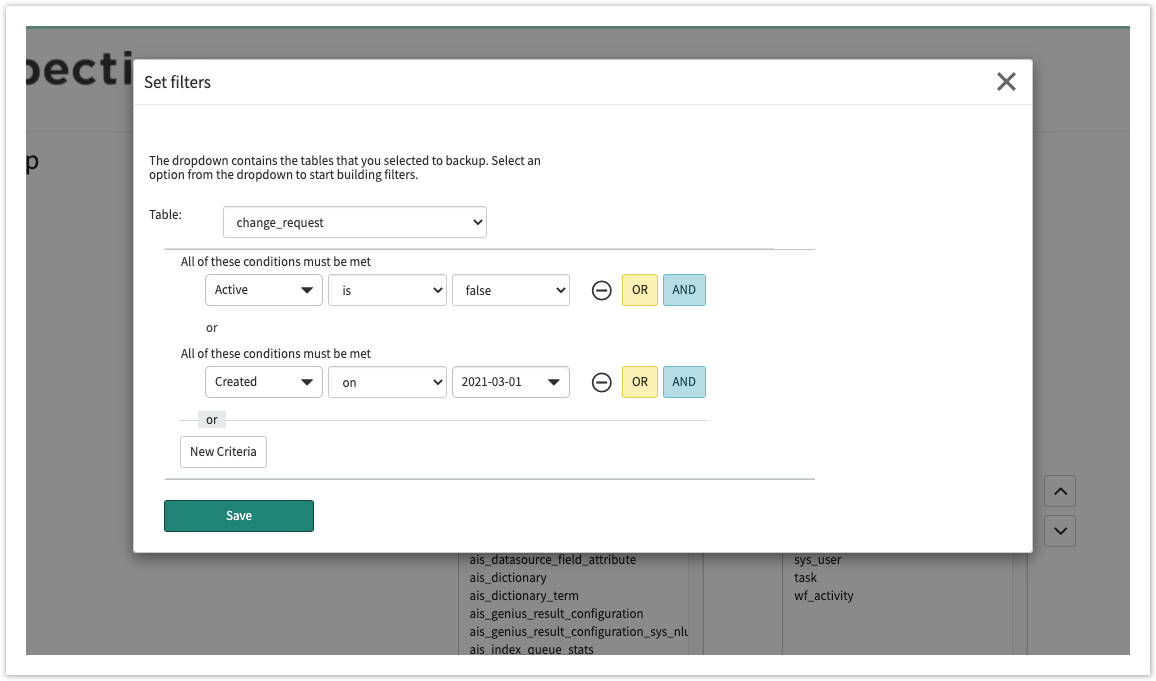
Then, select the table you want to filter and set the conditions with the condition builder.
Enable backup on related tables:
To backup attachments (sys_attachment and sys_attachment_doc) for with the tables selected, enable Include attachments.
Enable Include table components to backup all the related components needed for the selected table(s). Selecting this option will only select records related to your select tables from the following system tables:
- Custom fields in the dictionary entry (sys_dictionary)
- Business rule (sys_script)
- Access control (sys_security_acl)
- UI action (sys_ui_action)
- List (sys_ui_list)
- List element (sys_ui_list_element)
- Module (sys_ui_module)
- Form section (sys_ui_section)
To backup journal field (sys_journal_field) records related to the tables selected, enable Include journal fields.
No valid Data Center license found
Please go to Atlassian Marketplace to purchase or evaluate Refined Toolkit for Confluence Data Center.Please read this document to get more information about the newly released Data Center version.
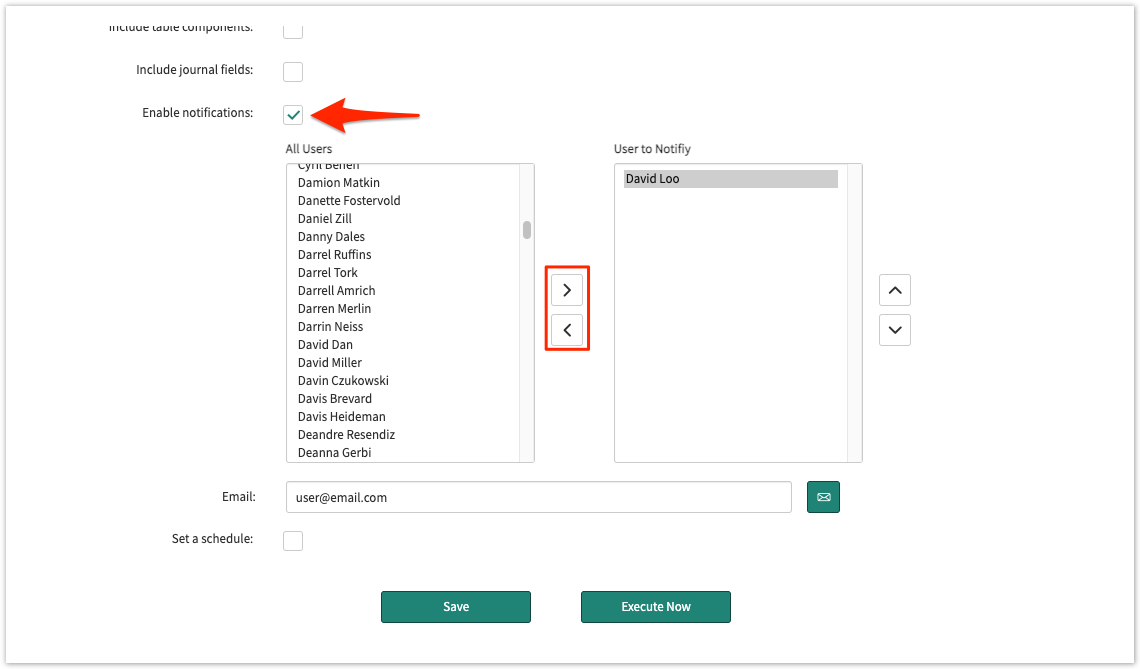
To enable notification for when backups are completed, check Enable notifications. Then, chose which users will receive the notifications or enter an email.
![]() NOTE: Perspectium notifications are created as ServiceNow email notifications in order to send emails natively through the instance and notifications use notification email scripts for the email's subject and body content.
NOTE: Perspectium notifications are created as ServiceNow email notifications in order to send emails natively through the instance and notifications use notification email scripts for the email's subject and body content.
The Snapshot notification has the following format:
Subject: Perspectium DataSync Snapshot completed: <Backup Name>
Body: Finished backing up snapshot <Backup Name> for tables: <Comma Separated List of Tables by Label>
See email notifications and notification email scripts for more information.
Instead of executing the backup right away, you can set a up a scheduled back up by enabling Set a schedule. Once activated, you can choose when to run the schedule.
After configuring all the required fields, click Save. This will save the backup for pending use later on.
If you did not set a schedule and want to execute the backup right away, click Execute Now.
No valid Data Center license found
Please go to Atlassian Marketplace to purchase or evaluate Refined Toolkit for Confluence Data Center.Please read this document to get more information about the newly released Data Center version.
No valid Data Center license found
Please go to Atlassian Marketplace to purchase or evaluate Refined Toolkit for Confluence Data Center.Please read this document to get more information about the newly released Data Center version.
Log into your ServiceNow instance and navigate to Perspectium > Snapshot > Snapshot.
Under Pending Backups, select the backup you want to execute. Then, click Edit.
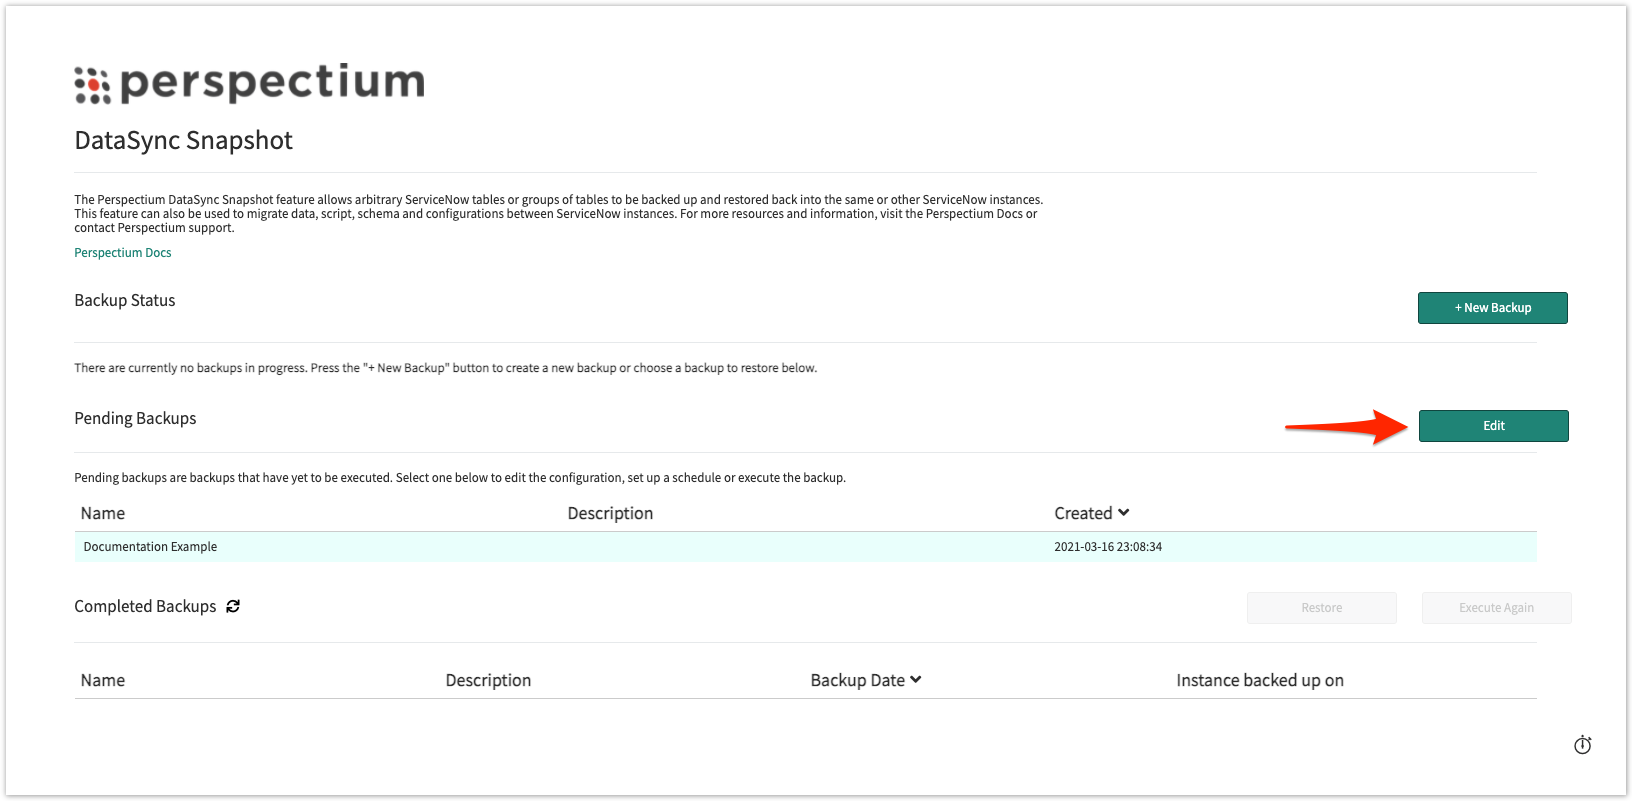
On the bottom of the page, click Execute Now.
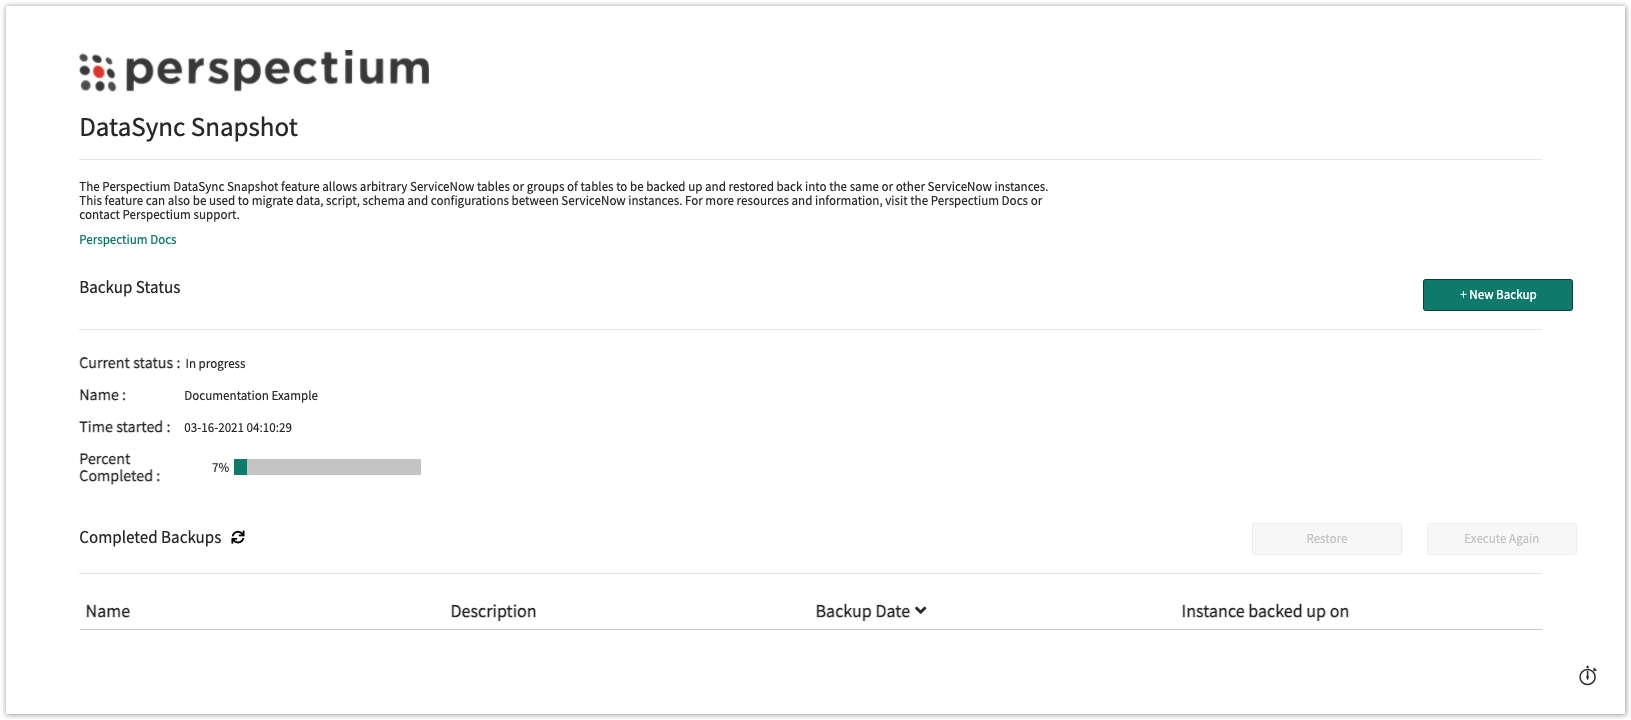
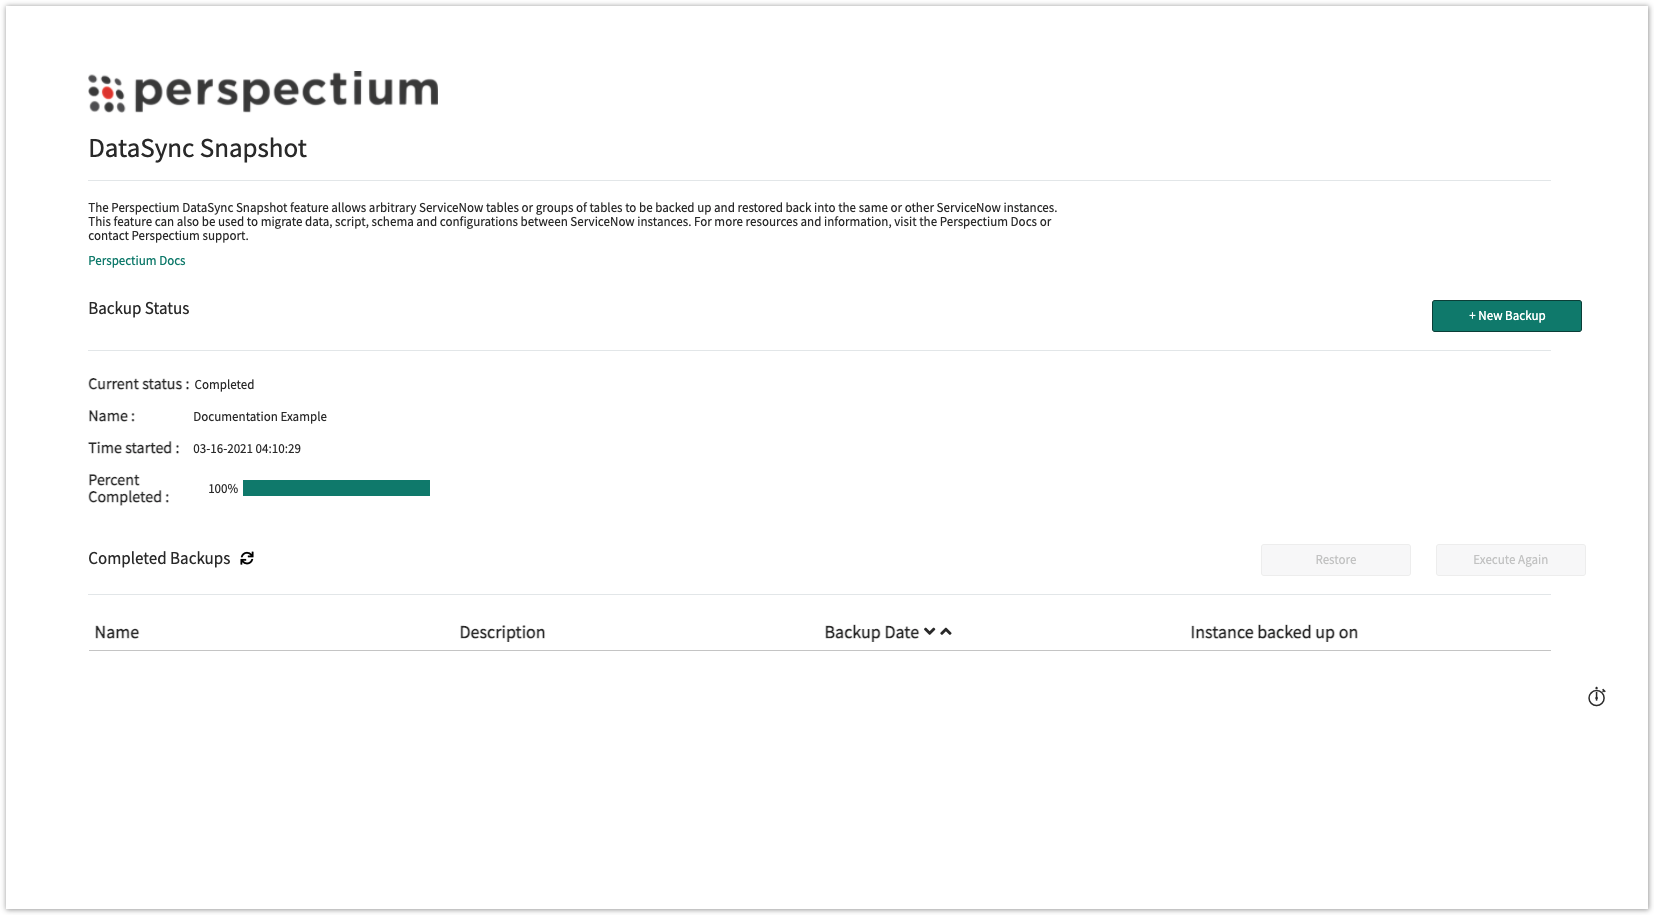
(Optional) Navigate back to Snapshot. Under the Backup Status section, monitor the status of your backup.
No valid Data Center license found
Please go to Atlassian Marketplace to purchase or evaluate Refined Toolkit for Confluence Data Center.Please read this document to get more information about the newly released Data Center version.
No valid Data Center license found
Please go to Atlassian Marketplace to purchase or evaluate Refined Toolkit for Confluence Data Center.Please read this document to get more information about the newly released Data Center version.
![]() WARNING: Restoring a backup will overwrite existing records.
WARNING: Restoring a backup will overwrite existing records.
Log into your ServiceNow instance and navigate to Perspectium > Snapshot > Snapshot.
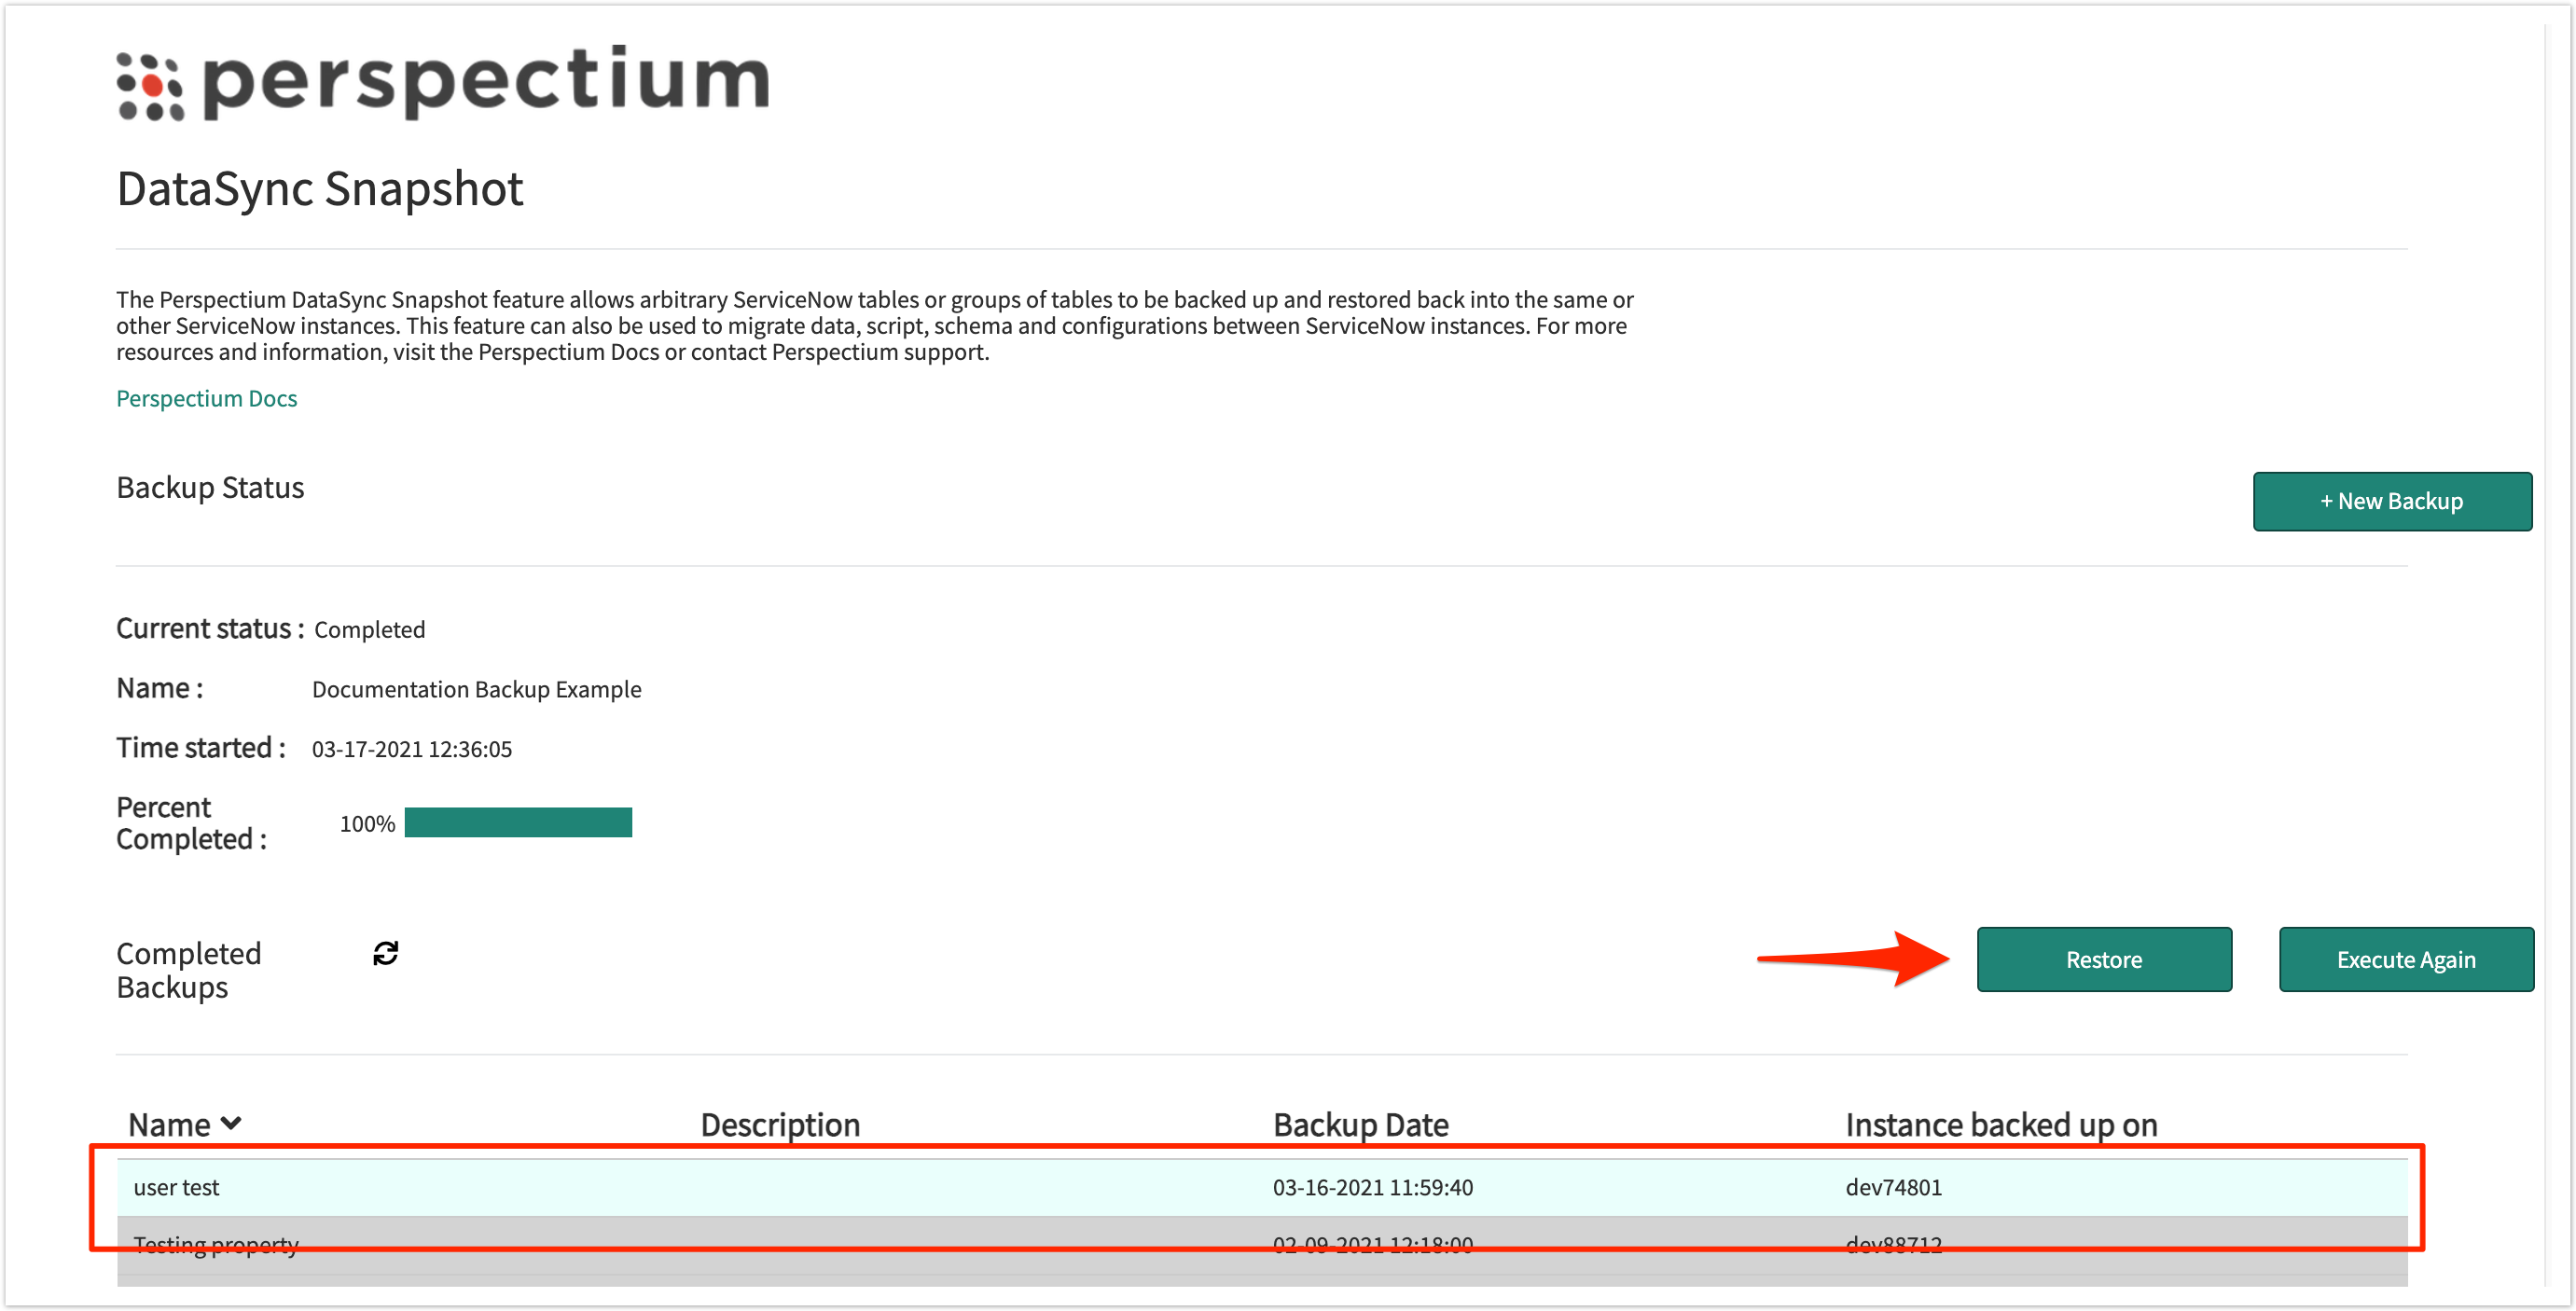
Whether you are restoring in your own instance or another instance, select the completed back up you want to restore. Then, click Restore. You will be prompted to continue and click Ok.
![]() NOTE: If you are restoring the table(s) in another instance, validate that you have the same Integration Mesh credentials. See set up initial configurations for Snapshot.
NOTE: If you are restoring the table(s) in another instance, validate that you have the same Integration Mesh credentials. See set up initial configurations for Snapshot.
Once restore is complete, your ServiceNow instance will start receiving inbound messages (Perspectium > Messages > Inbound) and the restored records in the selected table(s) will appear in your instance.
![]() NOTE: Restoring a backup will not trigger any dynamic shares that are enabled on the table(s) being restored.
NOTE: Restoring a backup will not trigger any dynamic shares that are enabled on the table(s) being restored.
No valid Data Center license found
Please go to Atlassian Marketplace to purchase or evaluate Refined Toolkit for Confluence Data Center.Please read this document to get more information about the newly released Data Center version.
No valid Data Center license found
Please go to Atlassian Marketplace to purchase or evaluate Refined Toolkit for Confluence Data Center.Please read this document to get more information about the newly released Data Center version.
When to use Snapshot
How to configure Snapshot for different uses are listed below. These listed are just some examples of how you can use Snapshot and if you have any questions about how you can best use it, contact Perspectium Support.
Upgrading a ServiceNow application
Learn how to setup and execute backup to prepare your ServiceNow instance for an upgrade.
Before you upgrade your application, you will need to back up the tables in your ServiceNow instance.
Log into your ServiceNow instance and navigate to Perspectium > DataSync > Snapshot.
Next click + New Backup.
Fill in all required fields:
Fill in the Name field with the desired name of the backup.
Within the Select an application section, choose the tables you want to backup. You can either pick tables manually from the Tables list or select an application which contains a set list of tables to backup.
![]() NOTE: These application templates are tables available in the global scope.
NOTE: These application templates are tables available in the global scope.
(Optionally) If you manually chose tables, you can save those selected tables as a custom application template with the + button next to the dropdown.
No valid Data Center license found
Please go to Atlassian Marketplace to purchase or evaluate Refined Toolkit for Confluence Data Center.Please read this document to get more information about the newly released Data Center version.
Enable Include table components to backup all the related components needed for the selected table(s). Selecting this option will only select records related to your select tables from the following system tables:
- Custom fields in the dictionary entry (sys_dictionary)
- Business rule (sys_script)
- Access control (sys_security_acl)
- UI action (sys_ui_action)
- List (sys_ui_list)
- List element (sys_ui_list_element)
- Module (sys_ui_module)
- Form section (sys_ui_section)
After configuring all the required fields, click Execute Now. This will start executing the backup immediately.
No valid Data Center license found
Please go to Atlassian Marketplace to purchase or evaluate Refined Toolkit for Confluence Data Center.Please read this document to get more information about the newly released Data Center version.
No valid Data Center license found
Please go to Atlassian Marketplace to purchase or evaluate Refined Toolkit for Confluence Data Center.Please read this document to get more information about the newly released Data Center version.
Once the tables are backed up, you can upgrade the application. Let’s say something went wrong or the upgrade removed a core functionality, time to restore that backup!
![]() WARNING: Restoring a backup will overwrite existing records.
WARNING: Restoring a backup will overwrite existing records.
Log into your ServiceNow instance and navigate to Perspectium > Snapshot > Snapshot.
Select the completed back up you want to restore. Then, click Restore. You will be prompted to continue and click Ok.
Once restore is complete, your ServiceNow instance will start receiving inbound messages (Perspectium > Messages > Inbound) and the restored records in the selected table(s) will appear in your instance.
No valid Data Center license found
Please go to Atlassian Marketplace to purchase or evaluate Refined Toolkit for Confluence Data Center.Please read this document to get more information about the newly released Data Center version.
No valid Data Center license found
Please go to Atlassian Marketplace to purchase or evaluate Refined Toolkit for Confluence Data Center.Please read this document to get more information about the newly released Data Center version.
Upgrading across different instances
Learn how to backup and restore table(s) when upgrading the application across different instances.
![]() NOTE: Before you begin, validate that you have the same Integration Mesh credentials across the different instances.
NOTE: Before you begin, validate that you have the same Integration Mesh credentials across the different instances.
In cases where you have two instances, i.e. one test environment and one development environment, and you want to upgrade the test environment, you can first execute a backup before doing the upgrade.
Log into your ServiceNow instance and navigate to Perspectium > DataSync > Snapshot.
Next click + New Backup.
Fill in the required fields:
Fill in the Name field with the desired name of the backup.
Within the Select an application section, choose the tables you want to backup. You can either pick tables manually from the Tables list or select an application which contains a set list of tables to backup.
![]() NOTE: These application templates are tables available in the global scope.
NOTE: These application templates are tables available in the global scope.
(Optionally) If you manually chose tables, you can save those selected tables as a custom application template with the + button next to the dropdown.
No valid Data Center license found
Please go to Atlassian Marketplace to purchase or evaluate Refined Toolkit for Confluence Data Center.Please read this document to get more information about the newly released Data Center version.
After configuring all the required fields, click Execute Now. This will start executing the backup immediately.
No valid Data Center license found
Please go to Atlassian Marketplace to purchase or evaluate Refined Toolkit for Confluence Data Center.Please read this document to get more information about the newly released Data Center version.
No valid Data Center license found
Please go to Atlassian Marketplace to purchase or evaluate Refined Toolkit for Confluence Data Center.Please read this document to get more information about the newly released Data Center version.
Let's say you now you wanted to upgrade the development environment as well. However during the upgrade, you run into issues because of conflicts with other applications on this instance. You can restore the backup from the test environment to the development environment.
![]() WARNING: Restoring a backup will overwrite existing records.
WARNING: Restoring a backup will overwrite existing records.
Log into your ServiceNow instance and navigate to Perspectium > Snapshot > Snapshot.
Select the completed back up you want to restore. Then, click Restore. You will be prompted to continue and click Ok.
Once restore is complete, your ServiceNow instance will start receiving inbound messages (Perspectium > Messages > Inbound) and the restored records in the selected table(s) will appear in your instance.
No valid Data Center license found
Please go to Atlassian Marketplace to purchase or evaluate Refined Toolkit for Confluence Data Center.Please read this document to get more information about the newly released Data Center version.
No valid Data Center license found
Please go to Atlassian Marketplace to purchase or evaluate Refined Toolkit for Confluence Data Center.Please read this document to get more information about the newly released Data Center version.
Backing up continuously changing environments
For instances where you are continuously making changes to, such as a development environment, you can schedule backups to automatically run on a repeated interval so you can restore at different points in time.
To schedule a backup on a repeated interval, do the following:
Log into your ServiceNow instance and navigate to Perspectium > DataSync > Snapshot.
Next click + New Backup.
Fill in the required fields:
Fill in the Name field with the desired name of the backup.
Within the Select an application section, choose the tables you want to backup. You can either pick tables manually from the Tables list or select an application which contains a set list of tables to backup.
![]() NOTE: These application templates are tables available in the global scope.
NOTE: These application templates are tables available in the global scope.
(Optionally) If you manually chose tables, you can save those selected tables as a custom application template with the + button next to the dropdown.
No valid Data Center license found
Please go to Atlassian Marketplace to purchase or evaluate Refined Toolkit for Confluence Data Center.Please read this document to get more information about the newly released Data Center version.
Enable backup on related tables:
To backup attachments (sys_attachment and sys_attachment_doc) for the tables selected, enable Include attachments.
Enable Include table components to backup all the related components needed for the selected table(s). Selecting this option will only select records related to your select tables from the following system tables:
- Custom fields in the dictionary entry (sys_dictionary)
- Business rule (sys_script)
- Access control (sys_security_acl)
- UI action (sys_ui_action)
- List (sys_ui_list)
- List element (sys_ui_list_element)
- Module (sys_ui_module)
- Form section (sys_ui_section)
To backup journal field (sys_journal_field) records related to the tables selected, enable Include journal fields.
No valid Data Center license found
Please go to Atlassian Marketplace to purchase or evaluate Refined Toolkit for Confluence Data Center.Please read this document to get more information about the newly released Data Center version.
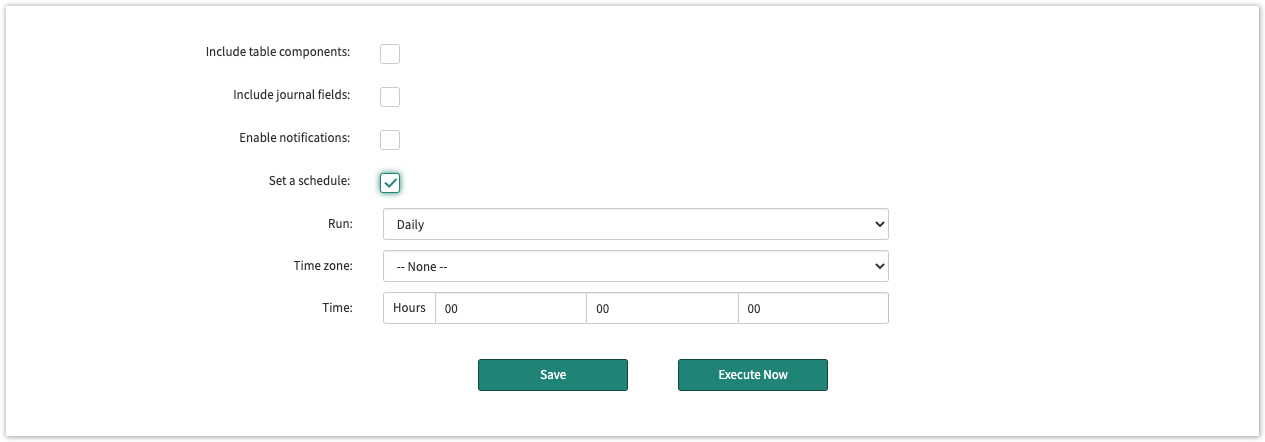
Check Set a schedule.
Once activated, you can choose when to run the schedule in the Run dropdown. In this case we've chosen Monthly to have a backup executed every month from this point forward.
Click Save.
No valid Data Center license found
Please go to Atlassian Marketplace to purchase or evaluate Refined Toolkit for Confluence Data Center.Please read this document to get more information about the newly released Data Center version.
No valid Data Center license found
Please go to Atlassian Marketplace to purchase or evaluate Refined Toolkit for Confluence Data Center.Please read this document to get more information about the newly released Data Center version.
Once you experience an issue and you feel the need to restore previous table(s), you can restore one of your previously executed backups.
![]() WARNING: Restoring a backup will overwrite existing records.
WARNING: Restoring a backup will overwrite existing records.
Log into your ServiceNow instance and navigate to Perspectium > Snapshot > Snapshot.
Select the most recent backup, then click Restore. You will be prompted to continue and click Ok.
Once restore is complete, your ServiceNow instance will start receiving inbound messages (Perspectium > Messages > Inbound) and the restored records in the selected table(s) will appear in your instance.
No valid Data Center license found
Please go to Atlassian Marketplace to purchase or evaluate Refined Toolkit for Confluence Data Center.Please read this document to get more information about the newly released Data Center version.
No valid Data Center license found
Please go to Atlassian Marketplace to purchase or evaluate Refined Toolkit for Confluence Data Center.Please read this document to get more information about the newly released Data Center version.