A Perspectium ServiceBond for AWS integration makes your incident management process more efficient, preserves data quality, gives you greater power over the management of your incidents, and increases incident visibility through consistent, repeatable actions. ServiceBond for AWS expedites the bidirectional syncing of your ServiceNow incidents with AWS Support Center cases, with the extraction, transfer, and loading of your data all happening behind the scenes in the Perspectium Integration Mesh.
![]() NOTE: Currently, ServiceNow is the only ITSM tool supported for a ServiceBond for AWS integration. Other ITSM tools will be supported in future Perspectium releases.
NOTE: Currently, ServiceNow is the only ITSM tool supported for a ServiceBond for AWS integration. Other ITSM tools will be supported in future Perspectium releases.
Prerequisites
![]() First, you will need an active ServiceNow instance (any version)
First, you will need an active ServiceNow instance (any version)
![]() You will also need an AWS account with a Business or Enterprise Support Plan
You will also need an AWS account with a Business or Enterprise Support Plan
![]() Finally, you will need to create an AWS EC2 instance Key Pair
Finally, you will need to create an AWS EC2 instance Key Pair
Bond AWS Support Center cases with your ServiceNow incidents
To bond your AWS Support Center cases with your ServiceNow incidents, follow these steps:
Access the Perspectium ServiceBond for AWS app
Log into your AWS account. Then, go to the AWS Marketplace and search for Perspectium ServiceBond for AWS. On the app landing page, click Continue to Subscribe in the upper right-hand corner of the screen.
On the Subscribe to this Software page, click Accept Terms to accept the terms of the Perspectium End User License Agreement (EULA) and the AWS Customer Agreement. Then, wait for your request to be processed and click Continue to Configuration.
Start CloudFormation launch
On the Configure this software page, choose Perspectium ServiceBond for AWS Deployment from the Fulfillment Option dropdown. Then, choose a Software Version and the Region where your AWS server is located and click Continue to Launch in the upper right-hand corner of the screen.
On the Launch this software page, choose to Launch CloudFormation from the Choose Action dropdown.
Launch CloudFormation
On the Select Template page, make sure the Specify an Amazon S3 template URL is selected and the URL is populated from subscribing to the app.
Finally, click Next.
Configure your AWS stack
On the resulting page, type a name for your Stack name consisting of letters, numbers, and dashes (e.g., Perspectium-ServiceBond-for-AWS).
Under Parameters, enter the following information in the appropriate fields:
| Field | Information to enter |
|---|---|
| Your email address | |
| ServiceNowURL | URL of your ServiceNow instance followed by /api/now e.g., https://dev12345.service-now.com/api/now |
| ServiceNowUsername | Username used to access your ServiceNow instance
|
| ServiceNowPassword | Password used to access your ServiceNow instance |
| ServiceNowDefaultCaller | Default value (in Firstname.Lastname OR FirstName LastName format) assigned to the ServiceNow Caller field for any ServiceNow incidents that are created proactively from newly created AWS Support Center cases |
| ServiceNowFilterConditions | You can optionally add Filter Conditions to trigger the syncing of your incident data from ServiceNow. These filter conditions must be entered as ServiceNow encoded query strings.
|

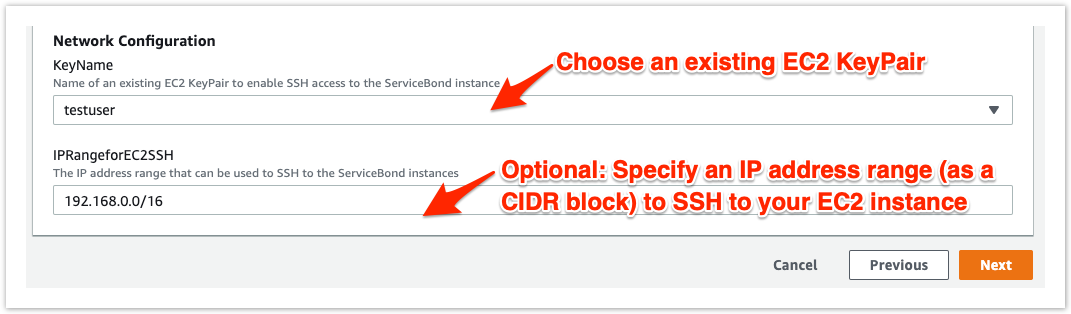
Next, choose a previously created EC2 Key Pair for authentication when accessing your ServiceBond EC2 instance via SSH.
![]() NOTE: If you haven't already created an EC2 Key Pair, you can create one within your AWS account or using a command line interface.
NOTE: If you haven't already created an EC2 Key Pair, you can create one within your AWS account or using a command line interface.
Optionally, you can specify ranges of IP addresses (as a CIDR block; e.g., 192.168.0.0/16) used to connect to your RDS and to SSH to your ServiceBond EC2 instance.
Finally, click Next.
Review and launch your AWS stack
The Configure stack options page contains some optional configurations you can set for your ServiceBond EC2 instance. For more information on these configurations, see setting AWS CloudFormation Stack Options.
However, in most cases, you can simply accept the default options on this page and click Next at the bottom of the page to navigate to the Review page and review your EC2 instance settings.
At the bottom of the Review page, check the box to acknowledge that AWS CloudFormation might create IAM resources. Then, click Create stack to finish configuring your ServiceBond EC2 instance.
After the CloudFormation stack has completed, your setup information will be saved in the file /perspectium-meshlet-aws/src/main/resources/config/perspectium_setup_information.txt on the EC2 instance created. If you entered your email address in Parameters in Step #4, this info will be emailed to you as well.
![]() NOTE: Your EC2 instance will take approximately 5-10 minutes to fully initialize. You can confirm that your EC2 instance is ready by navigating to Services > EC2 (under Compute) > Instances. Your EC2 instance will be ready when the
NOTE: Your EC2 instance will take approximately 5-10 minutes to fully initialize. You can confirm that your EC2 instance is ready by navigating to Services > EC2 (under Compute) > Instances. Your EC2 instance will be ready when the ![]() icon appears in the Status Checks column for your instance.
icon appears in the Status Checks column for your instance.
Commit the Perspectium AWS Category/Subcategory update set (optional)
To map your ServiceNow incident categories and subcategories with AWS Support Center categories, you can optionally commit the Perspectium AWS Category/Subcategory update set to your ServiceNow instance. For more information on committing ServiceNow update sets, see commit an update set.
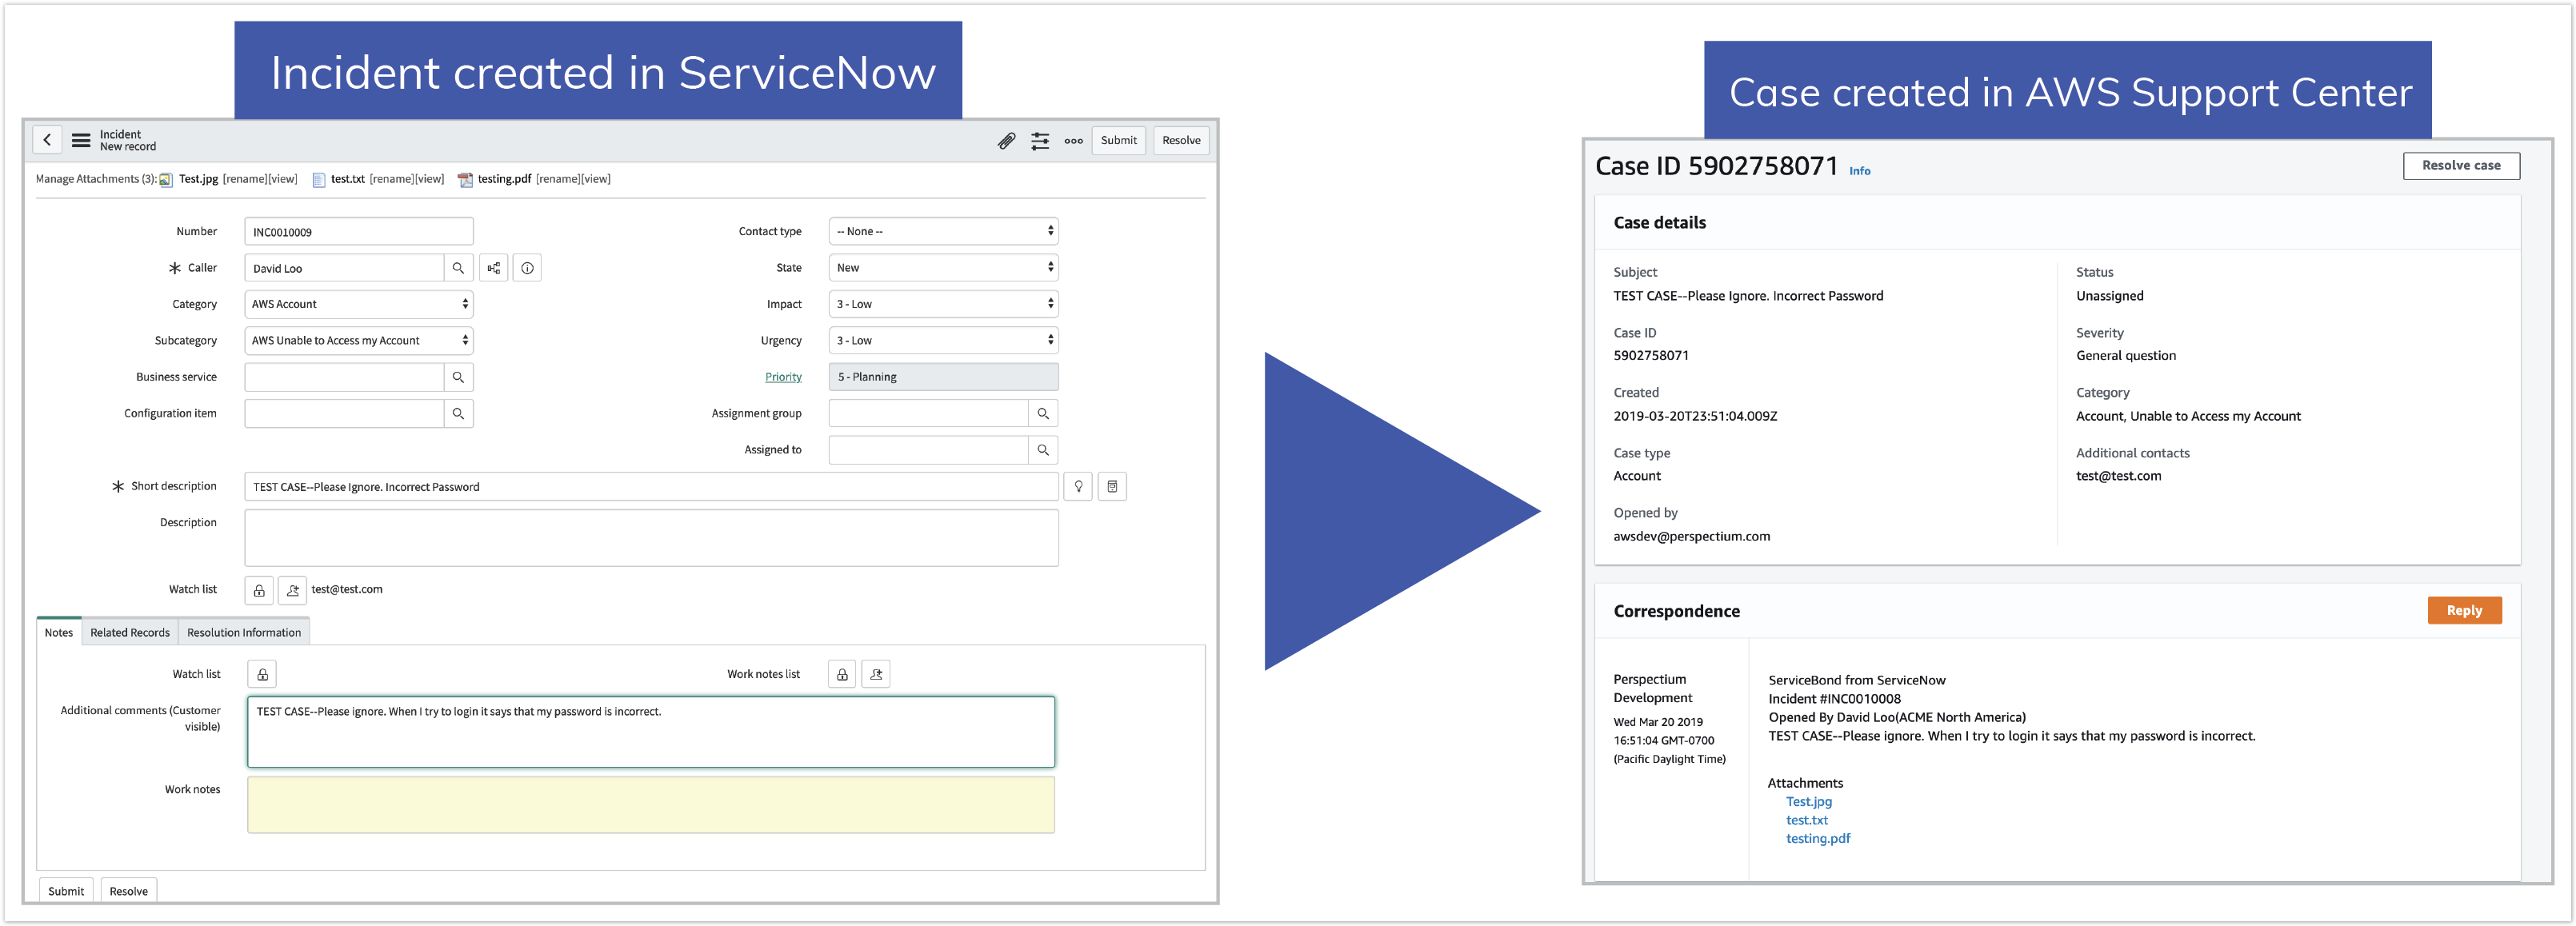
Create a ServiceNow incident
Log into your ServiceNow instance and navigate to Service Desk > Incidents. Click New at the top of the list to create a new incident. Fill out your ServiceNow incident details and click Submit to finish creating your incident.
View newly created AWS Support Center case
Log into your AWS account. Click Services at the top of the page. Then, type and click Support in the search window. A new case with related details to your ServiceNow incident will be listed at the top of the resulting page under My support cases. To see how the fields in your ServiceNow incidents will be mapped to fields in your AWS Support Center cases, see ServiceBond for AWS mappings.
![]() NOTE: You can also create an AWS Support Center case, and a matching incident will appear in ServiceNow. You will be limited to creating a maximum of 10 AWS Support Center cases per hour. All ServiceNow incidents that are created to match a newly created AWS case will have a Caller ID that matches Account ID name of the AWS user who created the case.
NOTE: You can also create an AWS Support Center case, and a matching incident will appear in ServiceNow. You will be limited to creating a maximum of 10 AWS Support Center cases per hour. All ServiceNow incidents that are created to match a newly created AWS case will have a Caller ID that matches Account ID name of the AWS user who created the case.
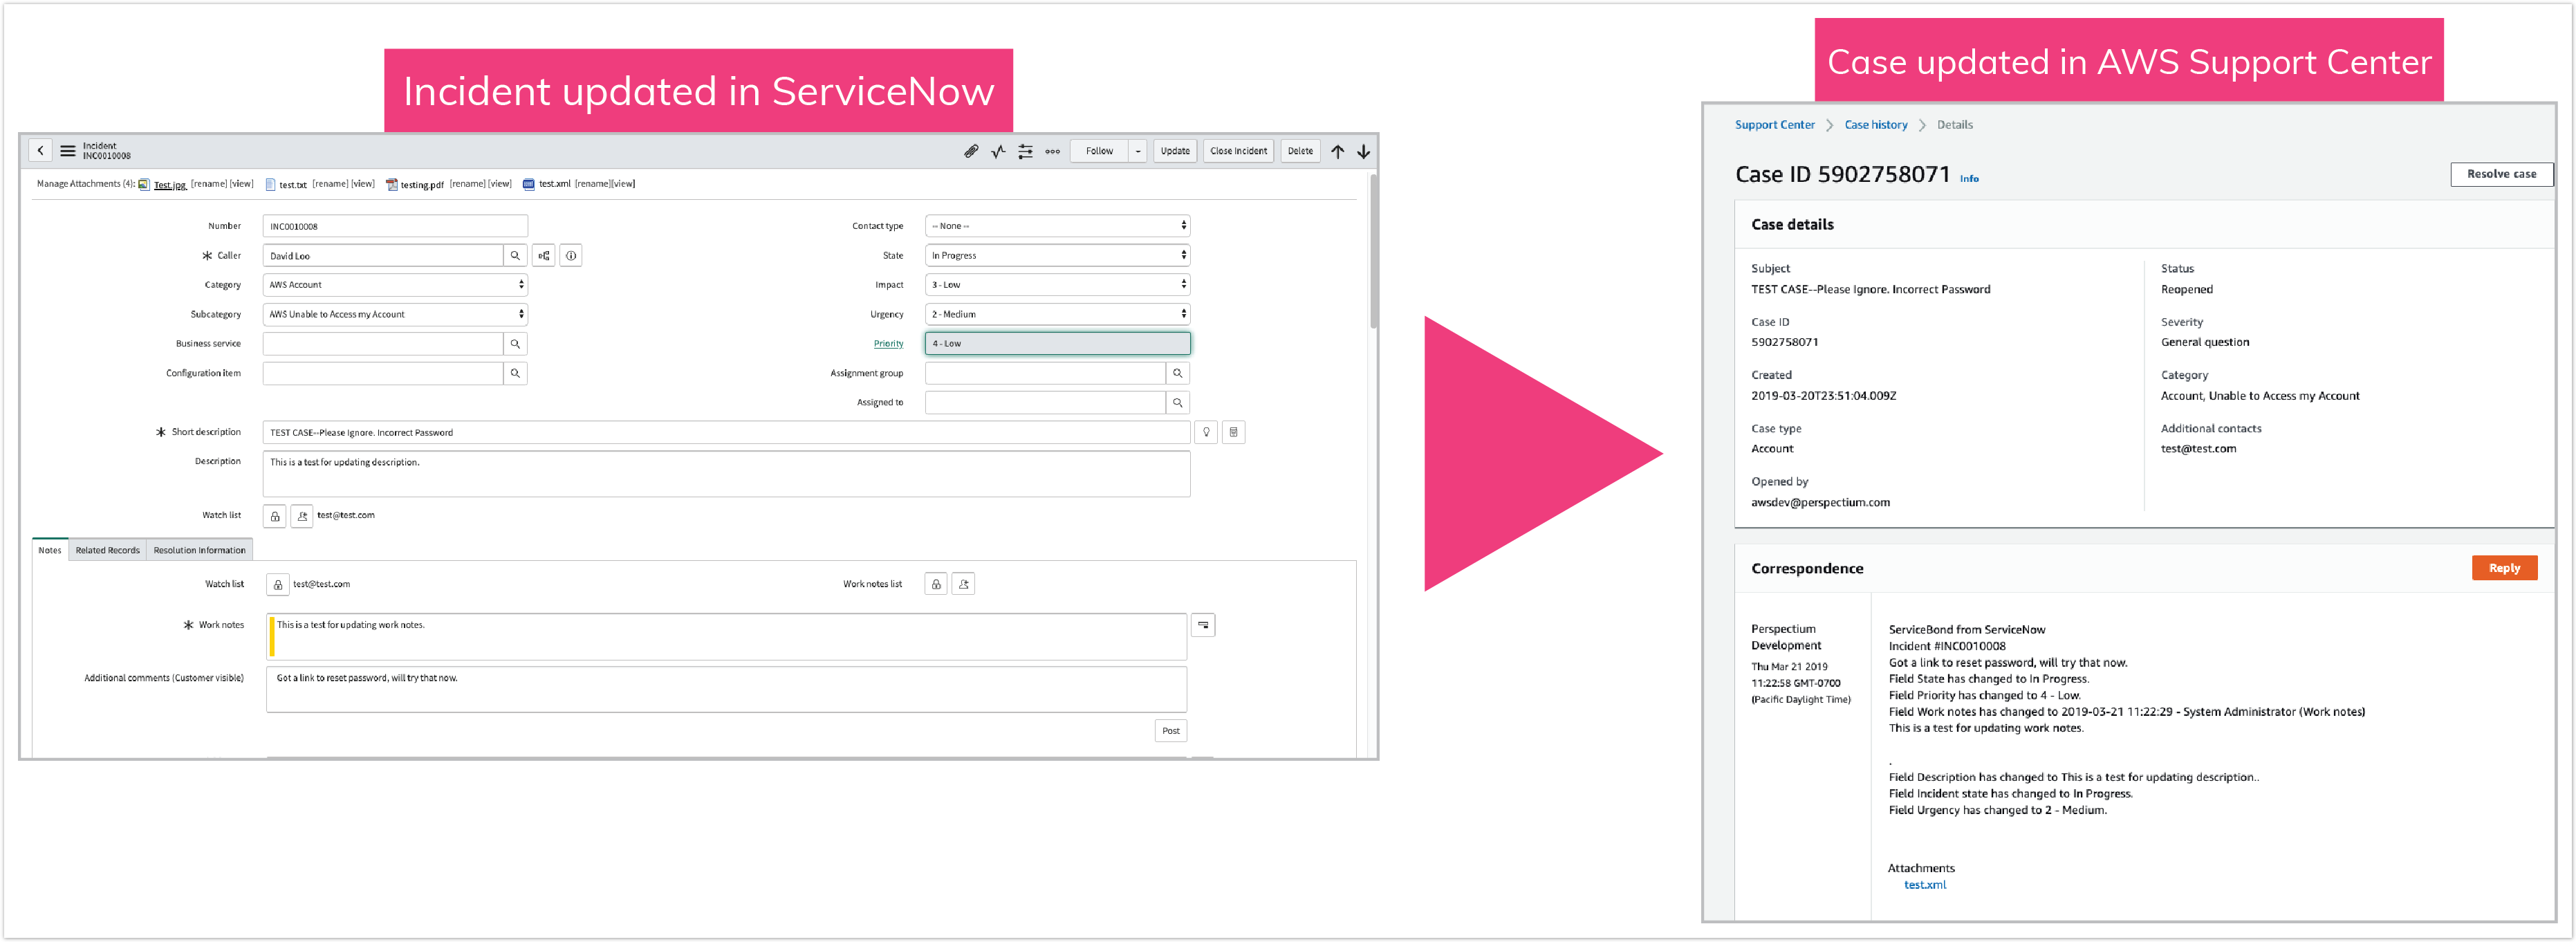
Update a ServiceNow incident
In your ServiceNow instance, navigate to Service Desk > Incidents and click into an incident that you want to update. Update any field in your incident and then click Update to save your changes.
![]() NOTE: If testing, use TEST CASE--Please ignore in the Short Description field and AWS Support will ignore the case when created in the AWS Support Center.
NOTE: If testing, use TEST CASE--Please ignore in the Short Description field and AWS Support will ignore the case when created in the AWS Support Center.
View your updated AWS Support Center case
Access the AWS Support Center and click into the case related to the incident that you updated in Step #8. See that the updates you made in ServiceNow will appear in the Correspondence section in your AWS Support Center case.
![]() NOTE: You can also update an AWS Support Center case, and the matching incident will be updated in ServiceNow.
NOTE: You can also update an AWS Support Center case, and the matching incident will be updated in ServiceNow.
![]() If your AWS Support Center has a large number of cases, it may affect the performance of AWS to ServiceNow updates. The Perspectium Integration Mesh must process all case records from AWS Support Center when sending any updates to ServiceNow.
If your AWS Support Center has a large number of cases, it may affect the performance of AWS to ServiceNow updates. The Perspectium Integration Mesh must process all case records from AWS Support Center when sending any updates to ServiceNow.
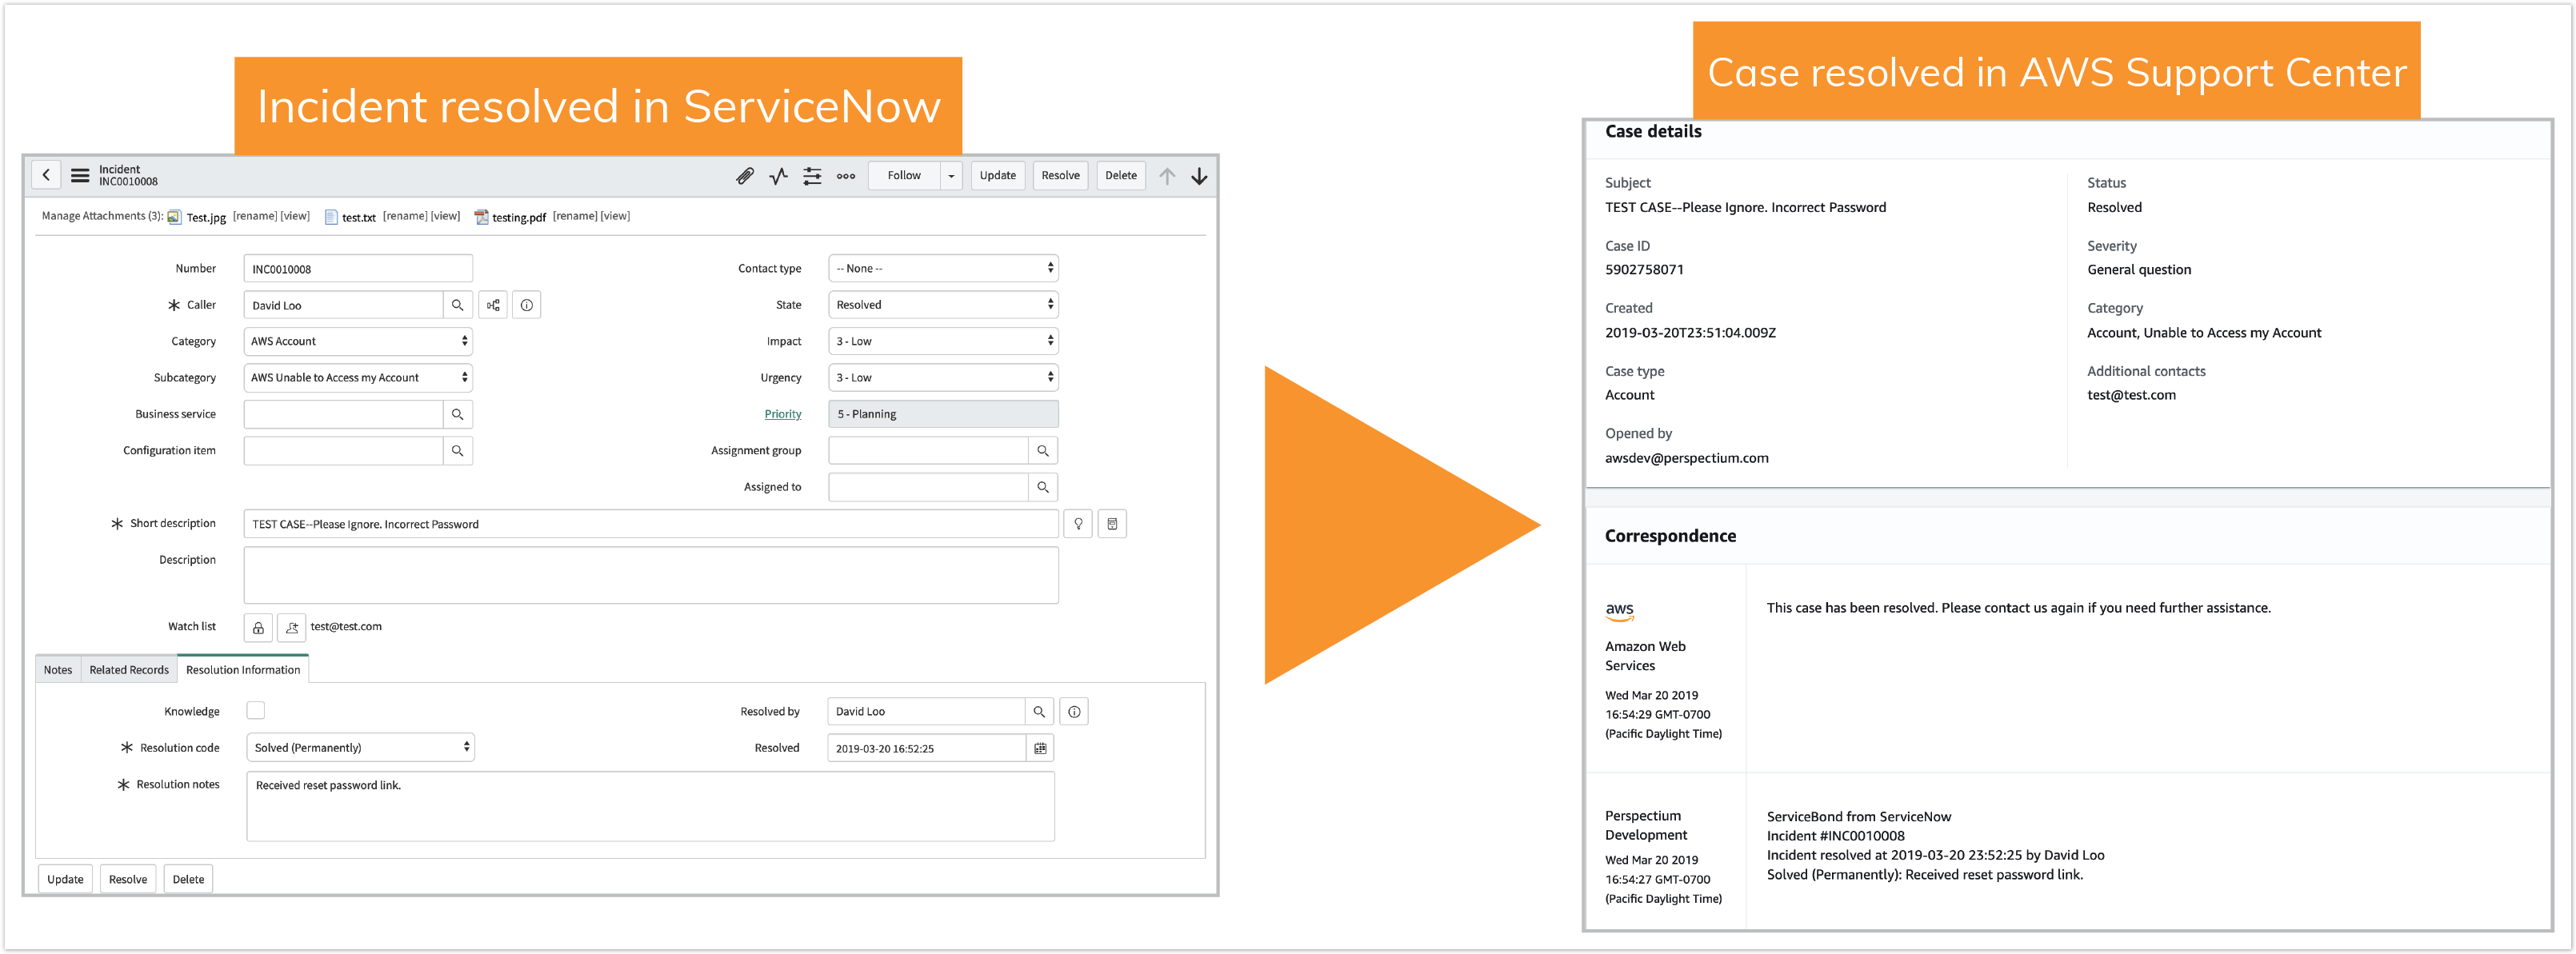
Resolve a ServiceNow incident
In your ServiceNow instance, navigate to Service Desk > Incidents and click into an incident that you want to resolve. Choose Resolve from the Status dropdown. Then, scroll down to the Closure Information tab and fill out the Close code and Close notes fields. Finally, click Resolve Incident in the top right-hand corner of the form.
View your resolved AWS Support Center case
Access the AWS Support Center and click into the case related to the incident that you resolved in Step #10. See that the updates you made in ServiceNow will appear in the Correspondence section in your AWS Support Center case.
![]() NOTE: You can also resolve an AWS Support Center case, and the matching incident will be resolved in ServiceNow.
NOTE: You can also resolve an AWS Support Center case, and the matching incident will be resolved in ServiceNow.