Page History
Add a table map to your ServiceNow dynamic share/bulk share
ServiceNow table maps are typically used in Perspectium Service Gateway integrations to handle the mapping of fields in certain ServiceNow tables as data is shared out of your instance. You can include a table map as part of your ServiceNow dynamic share or bulk share to help with field mappings and data transformation.
| Info | ||
|---|---|---|
| ||
|
Prerequisites:
- Commit a Perspectium update set containing table maps to your ServiceNow instance.
- Create a ServiceNow dynamic share or bulk share.
Instructions:
- In your sharing ServiceNow instance, go to Perspectium > Perspectium Core > Shares > Dynamic Share or Perspectium > Perspectium Core > Shares > Bulk Share.
- Click View Dynamic Shares or View Bulk Shares.
- From the available shares, click on the one that you want to add a table map for.
- In the Data Enrichment tab, click the search icon next to Table map.
- From the resulting list, select the table map you want to add.
- Click Update (top right).
Customize your target database schema using table maps
By default, data replicated from existing tables will automatically create the same schema at the replicated database. The targeted database schema of replication needs to be flexible and customized in certain situations, such as:
- An existing schema that the replicated data need to fit in
- A need to rename the field names or transform the field values using script at the source
- The resulting field types need to be modified to a specific type or field length
Customizing your target database schema is done by using table maps in your dynamic share or bulk share.
Here's how:
Prerequisites:
Instructions:
- In your sharing ServiceNow instance, go to Perspectium > Control and Configuration > Table Maps
- Select the table map you want to use (for the example, we'll use the table Incident to Common Incident), review the information in the fields, and check the Generate schema box.
 WARNING: If there are multiple table maps with the same Target table name, the agent will return the first record when querying against ServiceNow for the schema.
NOTES:
- Checking the Generate schema box is required in the initial sharing of your records.
- Specifying Field Type and Field Length is optional except for designating at least one field as Sys ID (GUID). This is required for the target database table to be created and queried for updates and deletes.
- The value specified in the Target table name field will be used as the name of the table in the database.
To share the table map output, you need to crate a dynamic share or bulk share and select the table map from step 1 in the table map field. The generated payload can be subscribed by an agent and the scheme created dynamically.
In this example, the common incident table map will result in the following table schema, if consumed by a database agent for MySQL.Code Block mysql> describe common_incident; +---------------------+--------------+------+-----+---------+-------+ | Field | Type | Null | Key | Default | Extra | +---------------------+--------------+------+-----+---------+-------+ | state | mediumtext | YES | | NULL | | | short_description | varchar(160) | YES | | NULL | | | description | mediumtext | YES | | NULL | | | priority | mediumtext | YES | | NULL | | | attachments | mediumtext | YES | | NULL | | | category | mediumtext | YES | | NULL | | | correlation_id | varchar(100) | YES | | NULL | | | number | varchar(40) | YES | | NULL | | | correlation_display | varchar(100) | YES | | NULL | | | caller_id | mediumtext | YES | | NULL | | | caller_email | varchar(100) | YES | | NULL | | | caller_full_name | mediumtext | YES | | NULL | | | comments | mediumtext | YES | | NULL | | | sys_id | varchar(224) | NO | PRI | | | | work_notes | mediumtext | YES | | NULL | | +---------------------+--------------+------+-----+---------+-------+ 15 rows in set (0.00 sec)
| Info |
|---|
Even though we specified the number field as the required Sys ID (GUID) field in the table map, the number field does not become the GUID. Instead, the sys_id field is created as GUID (PRI key) and contains number values to be used for lookup during updates/deletes. This is consistent with replicating database views. |
Create a ServiceNow table map
- In your ServiceNow instance, go to Perspectium > Control and Configuration > Table Maps.
- Click New.
- Select the table map direction (Outbound or Inbound) from the Direction dropdown. The fields available will change depending on whether you choose Outbound or Inbound.
Refer to ServiceNow table maps for more information on the difference between Outbound and Inbound table maps. - Complete the required fields:
- Enter a Name
- (For Outbound table maps only) Select the table you want to create table map for from the Source table dropdown
- (For Outbound table maps only) Enter the name of the target table in the Target Table Name field (e.g. incident)
- (For Inbound table maps only) Select the target table from the Target Table dropdown
- Click Submit.
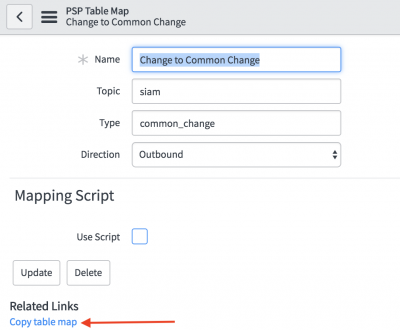
Copy a ServiceNow table map
Existing table maps, as well as transform maps and all other related mappings, can be duplicated or copied. If you plan to modify any of the Common Table Maps, e.g. Incident to Common Incident, we recommend that you modify a new copied table map.
Here's how:
- In your ServiceNow instance, go to Perspectium > Control and Configuration > Table Maps
- Select the table map that you want to copy
- Under the Related Links section at the bottom, click Copy table map
Use scripts to serialize records
Table maps can be configured to use scripts to serialize the record yourself. Within the script, you can set the variable answer to be the value you want the record to be serialized and returned as.
This is an advance configuration. Contact Perspectium Support for more information.
The following variables are available to use:
| Variable | Description |
|---|---|
| current | This represents the record that is being shared |
| gr_tablemap | This represents the outbound table map itself. For example if you want to access the table map's name, you can use gr_tablemap.u_name |
Instructions:
- In your ServiceNow instance, go to Perspectium > Control and Configuration > Table Maps.
- Select the table map that you want to add a script to or create a new table map.
- Under the Mapping Script section, check the Use Script box.
- Fill the Script field with the appropriate script. See below for an example script.
- Click Update.
Example of a table map script:
| UI Expand | ||||||||||
|---|---|---|---|---|---|---|---|---|---|---|
| ||||||||||
|
Always share field
ServiceNow table maps abide by the share only updated fields property that is set in the dynamic share record. However, if you want to override this setting, you can do so in the table field map record. This can be useful if you have a field that is designated as the record's unique ID field (such as the sys_id field) that you always want to share out, regardless of whether it's updated or not.
Prerequisites:
- Commit a Perspectium update set containing table maps to your ServiceNow instance.
- Create a ServiceNow dynamic share or bulk share.
- Add a table map to your dynamic share.
Instructions:
- In your sharing ServiceNow instance, go to Perspectium > Control and Configuration > Table Maps.
- Find and click the name of the table map that you want to modify.
- In the PSP Table Field Maps section, select the field that you want to always hare out regardless of the field being updated or not.
- Check the Always Share Field box.
- Click Update.